https://prozoda.com/product/leatherrepairs/
Real People’s Tips and Tricks for Handling Everyday Annoyances
Jonathan Dunlap | 3 months ago
This article was originally published on RealLifeDIY
Let’s face it: we could all be a little more effective in our everyday lives. We deal with many problems that could be solved with easy-to-do hacks, but some of them are so outside the box that we would’ve never thought of them on our own. But thankfully, there are creative people out there who did. So we assembled their best tips and tricks for dealing with common issues everywhere, from your home and wardrobe to your office and beyond.
Use Your Phone Camera to See Into Hard-To-Reach Places
This guy wowed us all when he came up with the brilliant idea of using the selfie camera on his phone as a periscope. He used it to check what was up with all his cables without having to go through the trouble of turning everything around or squatting into uncomfortable positions just to see them. This is definitely something we could all learn from and apply to our lives.
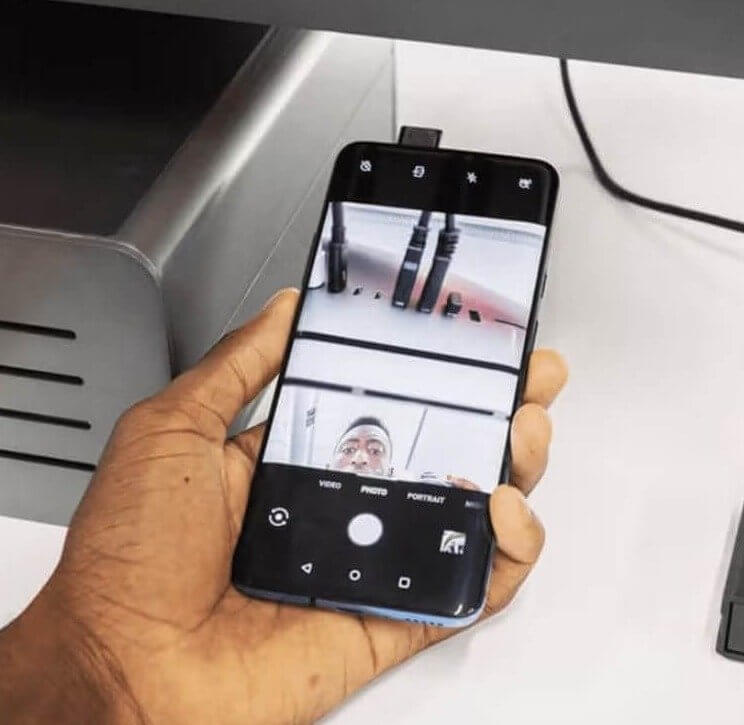
This also applies to the back camera! You can definitely use your back camera to gain a visual on some hard-to-get-to locations, especially ones in tall places. Give it a shot!
Bobby Pins Will Solve Your Knot-Related Troubles
Most of us know what bobby pins are; they’re those hair clips that seem to only sell in 100-count packs and somehow end up all over your bathroom. But it turns out they’re good for more than hairstyling. The next time you find yourself struggling with a knot, fuming with rage, wondering why on Earth you can’t manage to get it untied, try fetching a bobby pin. That should do the trick.
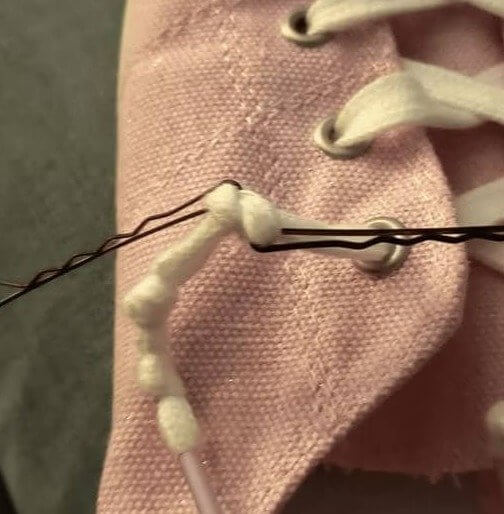
This little life hack is definitely one of those tricks that will save you a lot of unwarranted stress and rage. There’s nothing more infuriating than not being able to do something very trivial.
Know What Tools Are in Each Drawer Without Ever Opening One
Instead of tirelessly and endlessly going through thousands of things in these drawers to find the specific tool he needed, this guy decided to glue a little sample of each tool at the front of each drawer. That way, he could easily tell where everything was without opening a single one. If you ask us, whoever had this brilliant idea experienced a serious stroke of genius.
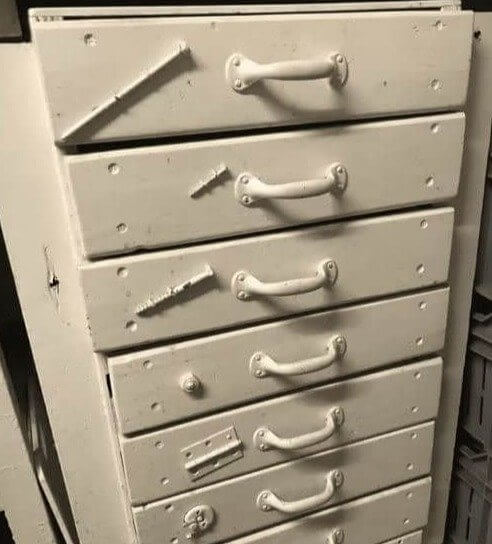
If you’re anything like us, then you waste time scouring draws in search of something that probably isn’t even there in the first place. Thanks to this person, we’ll do that no more.6 Tips to Help Dogs and Cats Get AlongKeep Watching6 Fun Facts for National Puppy Day00:00/01:19
Keep Cables Organized for Eternity
Look at how organized those cables are! Wow. Don’t you wish your cables were this organized? There’s only one way to truly keep those cables in place: plastic zip ties! Okay, maybe it’s not the only way, but it is one of the cheapest, most cost-effective ways to do so. And when done correctly, it looks super neat. And the good news is that it’s pretty difficult to mess up this hack.
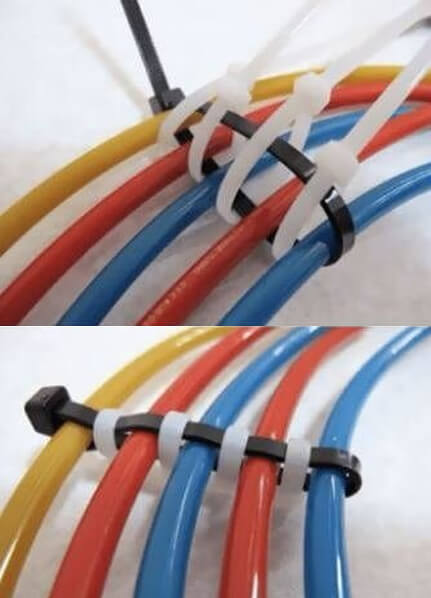
On a completely unrelated note, it seems as though the older we get, the more organized our cables should be. For some reason, it just bothers us more.
Put Stockings Over Drains to Stop Insects From Coming Out
If there’s one thing we hate in this world, it’s bugs invading our private space. Seriously, we need to reach some kind of agreement with the bug leadership so that they stay out of our territory. But, until that happens, you may want to stack up on stockings. Wrapping the bathroom drain with a stocking will help keep any curious bugs from going where they shouldn’t be.
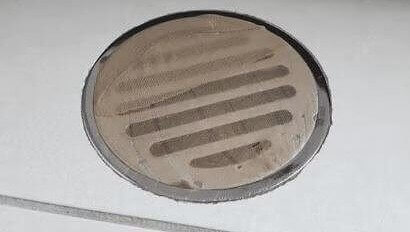
If bugs ever crawl into your home through the drain, this trick should do it. Drains are an effective infiltration strategy bugs have at their disposal, and this stocking trick counters it.
A Quick Fix for That Professional LinkedIn Shot
If you’ve ever found yourself in dire need of a professional-looking photo, such as the ones people seem to be uploading to LinkedIn all of the time, then you might be familiar with how difficult it can be to pull off that formal look. You need the right clothes, the right haircut, and so on. Thankfully, this creative solution can make the clothes part easier to improvise. Just look at how well it worked for this guy!

This hack will get you a “blazer” jacket at a moment’s notice. Just take a pair of black jeans, wrap them around your shoulders as in the picture, and there you have it.
Put That Wet Phone in Rice Immediately
The thing about modern phones is that they’re very sophisticated. Yet, with sophistication comes frailty, and boy, oh boy, are our modern phones both sophisticated and frail. Seriously, these things can go berserk if a tiny drop of water hits them in the wrong place. And that’s why we recommend having a container filled with rice stored and ready to go for any phone emergency, just like this grandma does.
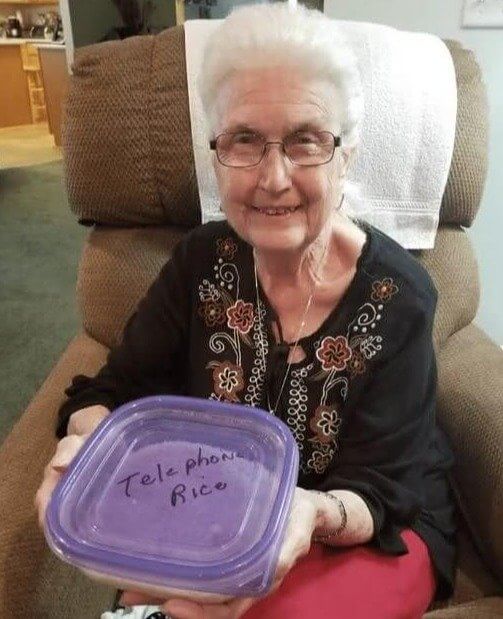
If your phone ever gets a little too wet for its own good, just stick it in a bowl of rice (or alternatively: salt). This little trick may just save your phone!
Take Advantage of the Rain
So we don’t know what kind of ancient hunter-gatherer spirit got into the bodies of the people who posted this, but they found a creative way to respect nature while using it to their advantage. They hooked up their gutter to the garden, creating an effective and eco-friendly watering system for their plants. The best thing is that it’s easily replicable. Anyone can do this; all it takes is a little bit of time and effort.

Oh, and plants, a gutter, and a little rain. The system utilizes excess rainwater to water the plants, just the way nature intended. And we bet it cut down their water bills, too.
Make Sure Everyone Knows if the Coffee Is Fresh
If there’s one thing that every office has, it’s coffee politics. There are a lot of things to say and a lot of decisions to be made when it comes to the office’s coffee supply. That’s why we believe in coffee co-existence, and this person is a proponent of that too. Look at this; he devised a way to let his colleagues know the office brew’s freshness so that no one has to suffer through a single sip of old coffee.
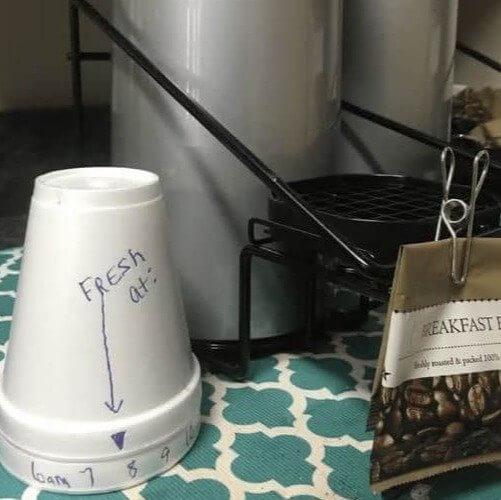
And his methods are so simple, too; all he did was take two styrofoam cups of coffee and make a neat, adjustable freshness gauge with them. Now, if only it were automatic.
Turn Your Thumb Into a Ruler
Mark an inch on your finger. You’d be surprised just how useful this can be for certain tasks around the house. Sewing, for instance, is made that much easier. Measuring things (obviously) becomes a piece of cake when you have the actual measurements on your hand; there is no need to scramble around for a ruler. This is just one of those straightforward and practical life hacks that’ll actually help you out.
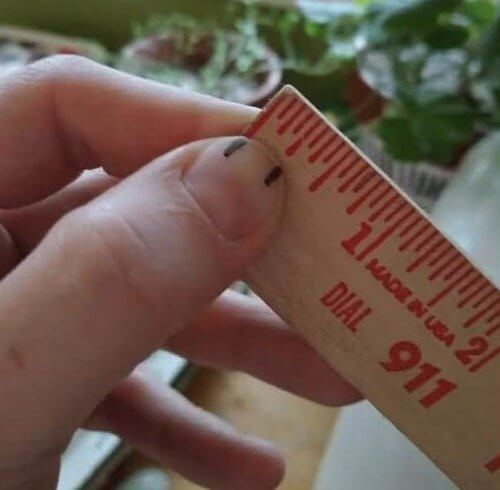
Just be careful not to get the measurements wrong, or else you could be looking at a whole lot of trouble. It’s important to be as precise as possible when it comes to these things.
Save Your Shirts by Transforming Bleach Stains Into Artistic Designs
Anyone who’s ever had the displeasure of staining their shirts with bleach knows that there’s pretty much nothing that can be done about a bleach-stained shirt. That is until this man pioneered his way out of this well-known deadlock. Yeah, this guy came up with something ingenious – he used the bleach to his benefit. After his shirt got bleach stained, he used more bleach as paint and turned it into a neat design.

This is exactly the way to make the most out of a bad situation; to make lemonade out of the lemons you were given. This life hack isn’t just about shirts; it’s about doing the best with what you’ve got.
Keep Your Dog’s Drinking Area Permanently Clean
Anybody who has had the displeasure of cleaning up day in and day out after their messy dog knows just how much of a pain it can be. It is not only tireless work but also a thankless job. One that you do and gain nothing from it. That’s why this person’s inventiveness is so welcome – he surrounded his dog’s water bowl with a small little garden. That’s plain genius!
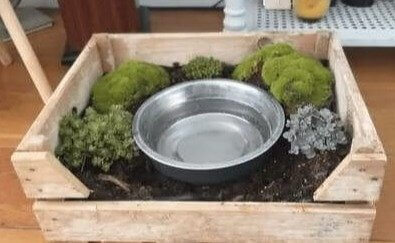
The reasoning behind the whole thing is that the plants will suck up all the excess spilled water instead of having it just mess up the floor. This is something that should be normalized.
How to Cancel Any Service Without An Annoying Back-And-Forth
It’s an unfortunate fact of modern life that getting rid of a subscription or service of some sort is often much harder than signing up for it. You may find yourself bombarded on a day-to-day basis by a whole bunch of people with different titles and jobs, all trying to persuade you to rethink your unsubscribing. Sometimes, it can get really overwhelming when they just won’t let you be.

That’s where this neat trick comes into play: next time you find yourself in a sticky situation such as this one, just tell them something so absurd and absolute that they have nothing to do but cancel your subscription. For this person, their go-to line is, “I am going to prison.” The customer service representatives quickly agree to cancel his subscriptions each time.
Add a Crane to Your Home’s Balcony
Anyone who lives in an apartment or a house with an entrance off of the ground, pay attention. If you have a balcony, you could be a lot lazier than you’ve been so far by getting things from the ground floor up to your place without carrying them up the stairs. Just attach a little hook to a bit of rope, and secure that to your roof. It’s easier than it looks and may save you a lot of effort.
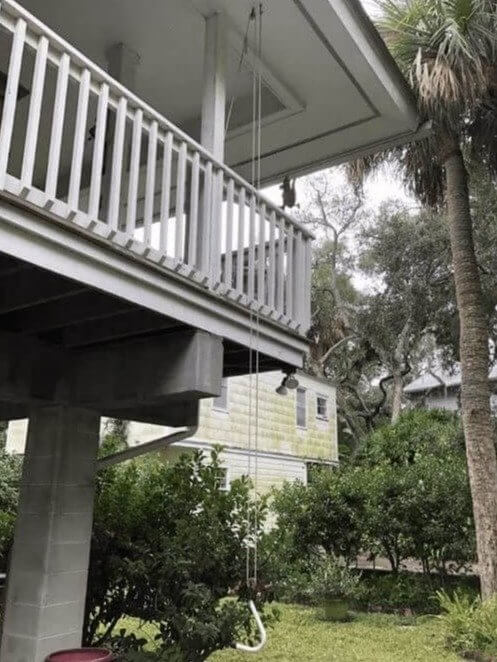
Imagine all the things you could get all the way into your apartment without busting a sweat. Doesn’t that sound tempting? If that doesn’t, you may just be untemptable.
Your Sweater’s Hood Was Actually Made to Hold Cute Puppies
Truth be told, that isn’t what hoods were made for. But it might be their destined second purpose, given just how perfectly puppies can fit inside them. That is, at least, when you wear them backward. You should give this little trick a go if you ever need to walk through a non-dog-friendly environment with a pup. Just wear your hoodie the wrong way around, put your little doggie inside the hood, and enjoy life.

Just look at the man in this photo. Doesn’t he look happy? Of course he’s happy; he’s ecstatic! He’s holding his adorable little dog in his own hoodie. What’s there to be sad about?
How to Connect Two Ziplock Bags to Make a Larger One
Ziplock bags are one of our favorite modern inventions. They are so practical and useful. But sometimes, you need a really big Ziplock bag, and you just don’t have one handy. Do not fear – someone came up with this genius solution. Take two Ziplock bags and turn just one of them inside out. Then, you can connect the two Ziplocka to each other, and, voila, you have a larger ziplock.
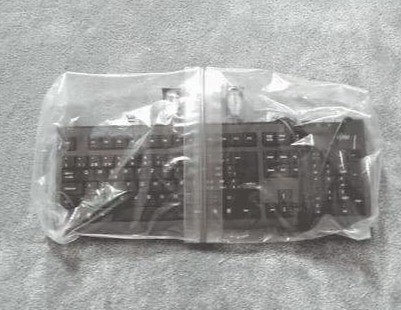
Now, you can fit all sorts of gadgets inside these practical bags. For example, if you need to take your work-from-home day to the beach, now you know how to protect that keyboard.
Having Trouble Rolling Your Office Chair in a Carpeted Room?
This person had a fiery, almost unsatiable urge to move his chair around his desk but couldn’t because of the carpeted floors. “Get one of those plastic mats,” his friends said. But his taste in interior decor told him a plastic mat was a big no-no. So, he threw the standard go-to solution out the window and put a small piece of hardwood floor on top of his carpet instead.
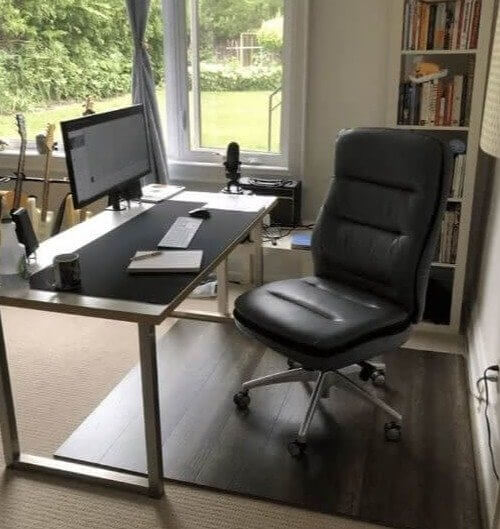
Now, he can roll from one side of his desk to another without a problem. And instead of having a random piece of plastic on his floor, he has an island of hardwood flooring.
Need a Tweezer but Don’t Have One Handy? This Coin Trick Will Do
Coins make excellent clamps! And if you’ve ever had the displeasure of getting a splinter jammed inside your skin, you know just how handy a pair of clamps or tweezers can be. Seriously, we have no idea how a micrometer of wood slightly jammed inside your skin can be so painful, but it is, and that’s just something we have to live with. Luckily, now we know this trick for those sticky moments.
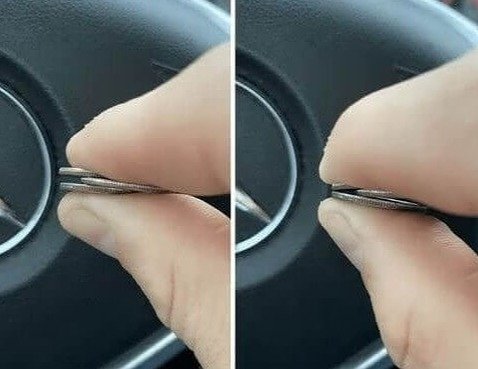
Line up three coins on top of one another and slide only the top and bottom ones together. In a few seconds, you’ll have your very own DIY tweezers! This is useful for removing splinters or even annoying hair.
Get Rid of Birds by Putting Fake Fruits on Your Garden Crops
This woman’s friends and family laughed at her gardening hack. Until it started showing results, that is. She began painting rocks to look like strawberries because she learned that if you put them around berry plants and bushes before the fruit appears, the birds will peck the red rocks. Since these birds don’t like pecking super hard surfaces, the idea is they will eventually leave the fruit alone – including the real fruit once it starts to grow.
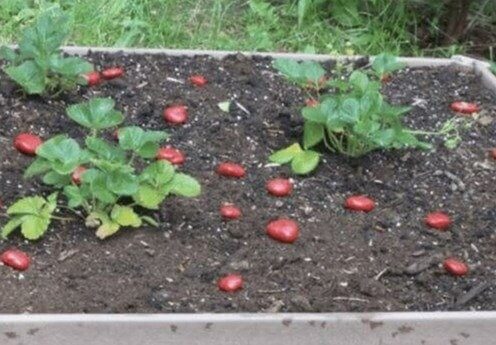
“We had about eight crows day after day, out by my raspberry bushes, and after the rocks were placed around… no crows,” this brilliant garden-lover reported.
How Grandpa Gets Away With Reading Random Novels in Church
There’s a story behind this picture: the original poster had asked his grandfather why so many of his books were smothered in duct tape. To that, his grandpa replied that he taped the covers so that they looked like bibles. That way, he could read them during church. Now, that’s diabolical. And it’s also genius. We can only hope God forgives this man for outsmarting the church like this.
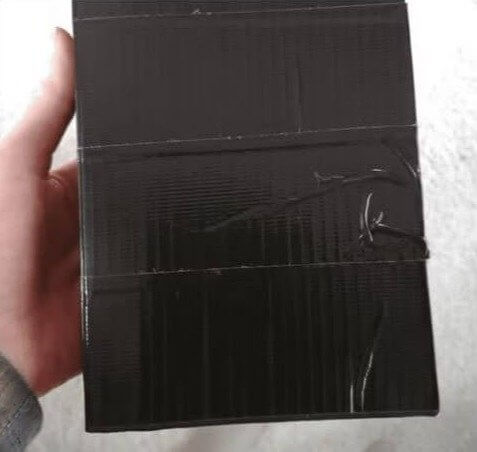
We wonder what kind of books he brought to the sermons. Were they raunchy? Were they just your regular-old books? Only the grandpa knows what went down in that church of his.
For When You Want Eyes in the Back of Your Head
If you’ve ever found yourself in dire need of a quick little check-up (say, for instance, you’re trying to make sure you don’t have any leftover food hanging around your face), then you may just enjoy this little trick right here. The original poster of this image obviously felt a bit crafty and decided to stick a spoon to his computer monitor, thereby turning his spoon into a fully-functioning mirror.
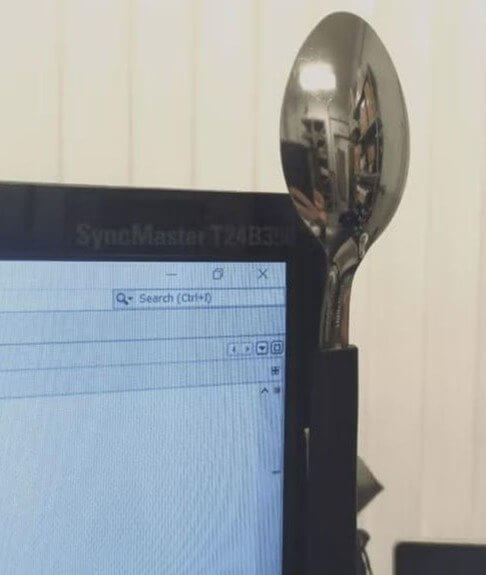
Now, this is definitely one of those tricks that you won’t be using every day, but there’s sure to be a time in which the whole spoon-mirror thing will help you out.
Give Your Ears a Rest While Still Wearing a Mask
One way to eliminate the discomfort of your face mask constantly sliding off or pulling off your ears is to fasten that mask onto a headband. How should one go about doing such a thing, you ask? Well, it’s all about buttons. Look at the person in the picture below and how they utilized buttons to hold their mask in place. Whether they realized it or not, they were onto something when they came up with this.
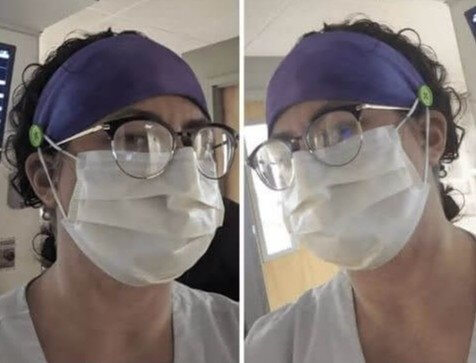
So if you find yourself having to wear masks often and dealing with them sliding off, just add some buttons to a headband, and it should fix the problem.
Help a Stranger Who Lost Their Keys
Ancient civilizations had a really good way of drawing attention to certain things – they marked them. They used whatever was at their disposal at a given moment to make something visually stand out. This can come in handy when trying to point out things in the real world. This person, for instance, had lost his car keys, only to find out that somebody had marked them out for him on the street.
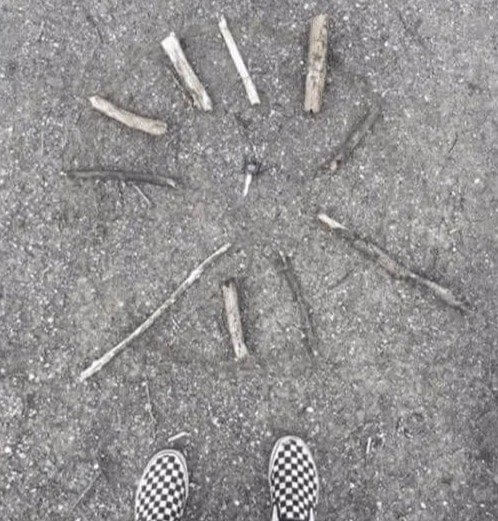
We do have to admit that this move is not only incredibly kind, but it’s also kind of ingenious. We’d probably never think to mark something out like this on the street.
No Leash, No Problem
You could use a leash. That’s the first method. The leash symbolizes the domination of man over his best friend, the total control and authority a person has over his furry pet. The second option is to use an open bag of chips; now, while the chips seem to be the more heterodox solution, it is, apparently, just as effective. It’s also a lot craftier and less authoritative.
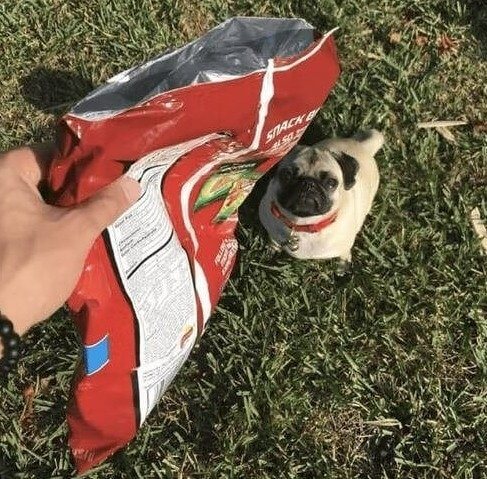
The dog, mesmerized by the prospect of tasting the salty goodness dangling before him, will follow the bag of chips wherever it goes. Now isn’t that a great way to control your pet?
The Ultimate Book Opener
This is one of those gadgets that anybody with just a tiny bit of woodworking skills can make. It’s also one of those things that those who do put in the time and effort to make it know that that was time and effort well spent. Anyone who’s into reading knows just how much of a pain having your book close on you all the time is. That’s why we need this gadget.
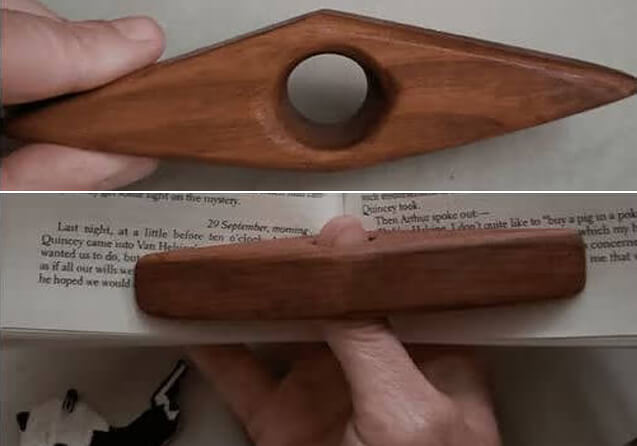
The best thing about this neat contraption is, though, just how it takes the load off your fingers. No more straining your fingers, desperately trying to keep your book open.
A Clever Way to Get Around a Broken Touch Screen
If there’s one thing we all dread, one thing that haunts our waking lives, one nightmare just waiting to erupt into reality and turn our lives into an insufferable affair, it’s the scare of having our phone’s touch screen give out on us. Seriously, there’s nothing scarier. That is, at least, until you learn that you can plug in your Micro USB to a USB, plug that USB into a Bluetooth gadget, and then use a mouse to navigate your phone.
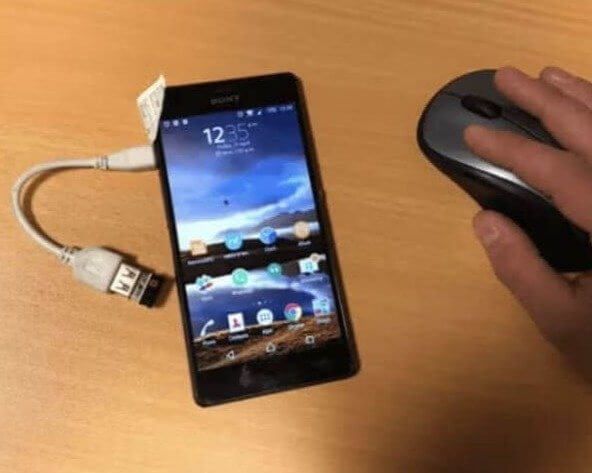
The craziest thing about this is that it actually works. Now, with this trick in mind, you’ll be able to save any files that were to go missing and reply to messages as you save up for a replacement phone.
Turn Your Empty Pill Bottles Into Cute Spice Containers
So, you’re taking some sort of prescription pills. Cool! Now, what on Earth are you to do with all those neat little containers? Well, you could just throw them away like some unknowledgeable simpleton, or you could utilize them to the utmost by turning them into spice containers! Now, how’s that a good idea? Imagine these bad boys filled to the brim with paprika, cumin, curry, and whatnot.
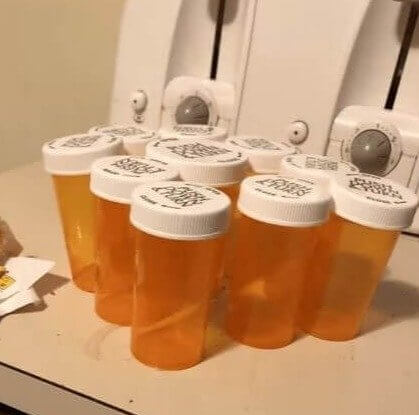
Also, imagine just how surprised all your guests will be when you pull out a prescription container filled with cinnamon. Isn’t it worth it just to see the look on their faces?
Use the Backs of Frames as Stands for Your Technology
Yeah, remember all those photos you’ve taken over the years of your loved ones, of lovers past and friends dear to your heart? Of your family, years ago, so far back, it’s almost cathartic to look at those photos and see how much you’ve all grown. Well, throw them all away. Who needs them? Now that you’ve done that, you can use those photo holders as a computer stand!

We’re just joking; we recommend using a frame, not in use for this hack. Now, you have a way to keep your tablets or laptops at the perfect angle.
Make Sure Your Tiny Dog Can’t Escape Through the Fence
So the original poster of this picture seemed to have a bit of a dog problem. His small little dog was just too tiny. In fact, he was so tiny that he managed to squeeze through the holes in the fence surrounding the backyard, which could have spelled disaster for the poor guy. So what did the owners do? Well, they thickened him up a bit and turned him into a literal hot dog.

Not only did they just enhance their pet’s cuteness factor at least threefold, but they also managed to find a nice, practical solution to their problem. Good on them and their creative thinking.
The Best Way to Warn People There’s No Toilet Paper
This is definitely one way of showing people that there’s no toilet paper, thus successfully averting what could have been a disaster. Imagine some good samaritan had the ingenuity in him to help you out like this in your hour of need; imagine all the awkwardness that could have been avoided. If only everyone did this, we would be truly living in a better world. A kinder world.
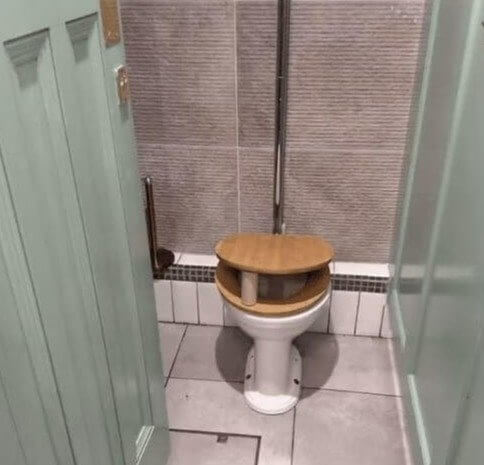
But, alas, not everyone will do this, and that’s just an unfortunate fact of life. It does make us appreciate the times when someone does go through the trouble of warning us like this.
Dog Cones Are so Out, Cowboy Hats Are so in
If there’s one unfortunate fact that every parent and dog owner alike knows, it’s that they have the responsibility ility of taking care of their pet or kid. This also means making sure he doesn’t scratch himself into oblivion. How does one go about making sure of that? Well, one could utilize a random cowboy hat and have his dog shish-kebab it like so. It’s a great solution, and it’s also cute as heck.
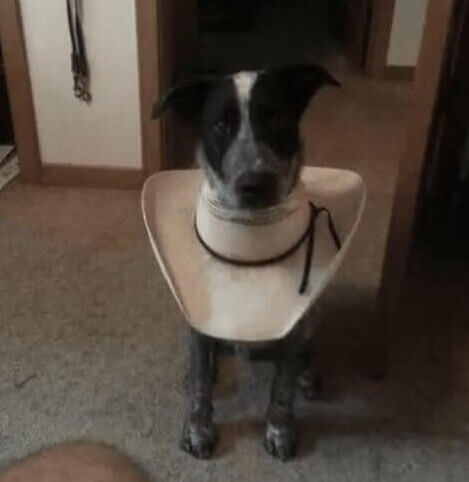
Just look at this adorable little creature; he looks so happy and healthy in his little cowboy hat. More people should dress their dogs up as cowboys. That much is certain.
Color-Code Your Earphones for Easier Use
If there’s one thing we know as modern people with modern sensibilities, it’s that symmetry is grossly overrated. Sometimes, a little bit of asymmetry may just save you a lot of hustle. Take these earphone caps, for example; if you switch one of your earphone caps with a spare cap that you saved from a different pair of earphones (for instance), you’ll be able to tell apart right from left, no problem.
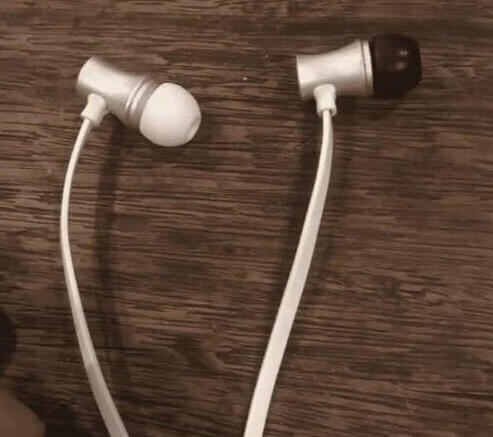
Also, saving your earphones is just generally a good idea. Earphones tend to shed their silicone caps for some reason, so you may just want to keep a few extra pairs around your house.
Wheelbarrows Can Be Great Outdoor Seating
You may have gone about your life believing that you did not need a wheelbarrow. “A wheelbarrow,” you would probably say, “Why on Earth would I ever need something like that? The very prospect of me needing a wheelbarrow is preposterous.” Well, prepare to eat your words because this guy just came up with a whole new use for the wheelbarrow – he turned it into the perfect camping chair.

Just look at how comfortable this guy seems chilling in his impeccably crafted chair. He looks at peace; he looks at one with the universe. This is something we need in our lives.
Wrenches Are Handy When Lifting Heavy Buckets
Not many know about the secret history of wrenches. Truly, the history of this repair tool has been a well-kept secret for many, many generations, but everything’s coming to light now. Okay, actually, there is no secret wrench history. We just made that up to make this lifehack seem a bit juicier. This hack, though, is actually real, and it may just help you out of a pinch one day.
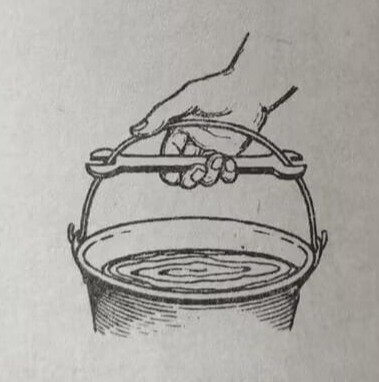
If you ever find yourself stuck struggling to carry a huge bucket filled with heavy things, you may just want to try sticking a wrench in between the arch of the bucket’s actual handle. That’ll definitely make things easier.
A Simple Bra Hack for the Horse Lovers
This just in: bras make for great DIY eye shields. Now, unless you own a horse, we’re not quite sure what kind of use you could possibly have for eye shields, but this little trick may just come in handy when you least expect it. Life, after all, is full of surprises, and some of them may just call upon you to break out your bra-eye-shield combo.
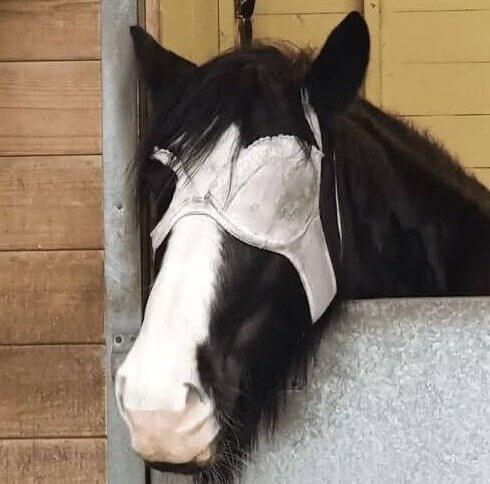
This situation, for example, features a horse with an eye infection. His caretakers had nothing to wrap his eyes with but a bra, but that was good enough, and the horse got the treatment he needed!
29 Free Things to Do in Arizona
From art walks to major museums, these budget adventures will delight the whole family.
By Keridwen CorneliusPublished February 2, 2023

Savvy travelers don’t have to pay to play in Arizona’s saguaro forests, sienna-hued mountains, and buzzing cityscapes. This guide will steer you to world-class museums, expert-led walks, and artsy adventures that don’t cost a dime.
Phoenix
Home to the country’s largest collection of urban protected areas, the Valley of the Sun stretches across mountainous desert parks like an enormous playground. Maricopa County Parks and Recreation offers a bounty of budget friendly, ranger-led outings. Prowl like a nocturnal animal on a night hike in White Tank Mountain Regional Park, keeping your eyes peeled for ringtails, owls, and scorpions that glow neon green in black light. Get answers to your burning questions about Sonoran Desert flora and fauna on a Desert 101 walk in Cave Creek Regional Park. Or boost biodiversity by helping uproot invasive species in Spur Cross Ranch Conservation Area.
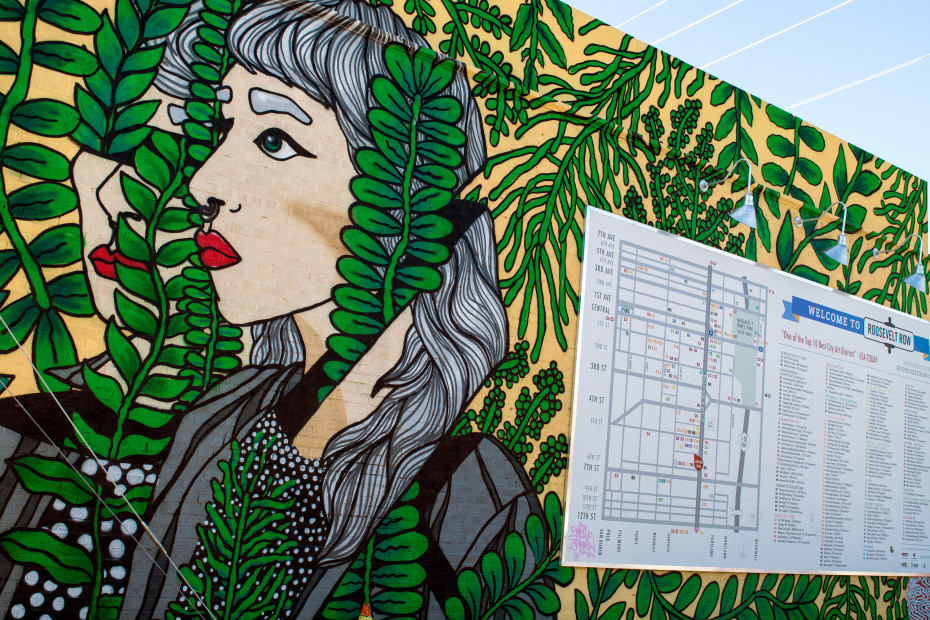
For a classic, cost-free Phoenix activity, soak up the carnivalesque atmosphere of First Fridays. Crowds stroll through downtown’s mural-decked Roosevelt Row, perusing paintings and sculptures in 70-plus art spaces. First Fridays also feature the auditory arts: Head to the Nash for free jazz, and follow the sounds of fiddles and pennywhistles to the Irish Cultural Center for rollicking traditional music. A calmer experience awaits at nearby FOUND:RE Phoenix Hotel, which offers free flow yoga every Sunday.
With some strategic planning, you can explore Phoenix’s top cultural attractions gratis. Get inspired by the Asian art and imaginative fashion exhibits at the Phoenix Art Museum. Admission is free from 3 p.m. to close every Wednesday and on First Fridays. Also on First Friday evenings, kiddos can get creative and literally climb the walls at no cost in the Children’s Museum of Phoenix. Contemplate American Indian art and cultural exhibits told from an Indigenous perspective at the Heard Museum. Entry is free on First Fridays (except in March) and on third Saturdays from June through August. Finally, bask in the beauty of blooming cactuses and bizarre arid plants at the Desert Botanical Garden, free on the second Tuesday of each month.READ MORE:Must-Visit Spots and Hidden Gems in Phoenix
ADVERTISEMENT
Scottsdale
In the northeast corner of the Valley, the McDowell Sonoran Preserve undulates across 30,580 acres of saguaro-striped mountains. Skilled guides lead free beginner- and intermediate-friendly mountain biking clinics where you can amp up your confidence on gentle paths or twisty technical trails. Experts also lead hikes on topics such as Arizona history, medicinal plants, and nature as therapy.
In town, the Scottsdale Museum of Contemporary Art (SMOCA) offers complimentary entry to its thought-provoking exhibits on the second Saturday of each month and every Thursday. Pair a Thursday evening visit with ArtWalk, when culture lovers pop into galleries in the Scottsdale Arts District to chat with artists and listen to live music. On Sundays from April 30 to May 28, families picnic and dance to motown, disco, or R&B bands during McCormick-Stillman Railroad Park’s free concerts. READ MORE:What to Do and See in Scottsdale, Arizona

Mesa
It seems like Mesa is always hosting a family friendly festival, and at many events, you can leave your wallet in your pocket. Every Saturday during Mesa Feastival, adults can jive to live music while the bambinos frolic in the splash pad and playground after noshing on grub from food trucks at Pioneer Park. At 2nd Friday Night Out, historic downtown Mesa’s galleries and shops stay open late, costumed kids play contests and games, and live music reverberates along Main Street. On Thursdays in spring and fall, Mesa Arts Center throws a free Out to Lunch concert series in the shade outside. While you’re there, step inside (admission is always complimentary) and delve into the upcoming exhibits on nature-themed woodcut prints, contemporary crafts, and more.
Tucson
In the Old Pueblo, you don’t have to spend a pretty penny to have experiences that make your spirit soar. At San Xavier del Bac Mission, marvel at statuary and frescoes so stunningly ornate the church is known as the Sistine Chapel of North America. Get a hawk’s-eye view of Tucson on Tumamoc Hill while learning about the landmark’s 2,500-year history from the free Tumamoc Tour app.
At the always-gratis Center for Creative Photography this year, visitors can see Tucson’s barrios through the lens of Chicanx photographer Louis Carlos Bernal, plus photographic slices of Linda McCartney’s life with husband Paul. And on the first Thursday of each month, the Tucson Museum of Art opens its doors for free, adding entertainment and gallery activities to its Western and Colonial Latin American art.READ MORE:Tucson: The Southwest’s Best Affordable Escape

Sedona
According to local lore, this red rock Shangri-La is permeated with vortexes—energy hotspots where visitors can channel healing, inspiration, and insight. Hike and watch the sunset flame across the mountains at Airport Mesa vortex, and visit the Chapel of the Holy Cross, perched atop another vortex. Designed in 1932 by Marguerite Brunswig Staude, a disciple of Frank Lloyd Wright, the minimalist church’s sky-high windows overlook sensational views of vermilion mountains. Maintain your meditative mood at Amitabha Stupa and Peace Park, a spiritual destination for all faiths featuring Buddhist shrines and a Native American medicine wheel, backdropped by classic Sedona scenery.
On First Fridays, gallery-hop and indulge in free refreshments at some of Sedona’s 80-ish arts venues showcasing Western painters, photographers, glass-blowers, and more. Many First Friday receptions take place in Tlaquepaque, an alfresco Mexican-style arts and crafts center that frequently hosts free flamenco performances and nature education presentations.
Flagstaff
This alpine town is all about outdoor fun and budget-friendly community bonding. Every Saturday evening in summer, families gather in Heritage Square, tuck into sleeping bags and popcorn, and watch free, kid-approved movies. On Wednesday evenings in summer, local bands play free concerts in Peaks View County Park while families picnic, hula hoop, and get their faces painted.
Self-guided walking tours abound in Flag, which features a 56-mile Flagstaff Urban Trail System. Download a map and pound the pavement past historic buildings, meadowy riparian areas, and pine forests. In Flagstaff’s Southside Historic District, get your kicks by walking the original Route 66 alignment. Dial 928-218-2926 to hear the Walk This Talk audio tour and learn why highway officials abandoned the initial Mother Road track through town. You can also download a public art walking or biking tour map to discover more than 40 murals and installations.UP
Five Ways to Block or Hide Your Phone Number
How to clean a dishwasher with vinegar
The dishwasher is one of those appliances that often work overtime, especially when we’re doing lots of cooking and hosting guests. White vinegar has long been used for cleaning around the house, from windows and mirrors to kettles and showerheads.
null© Future PLC / Sophie Gale
You can clean a dishwasher with vinegar too, to give it that next level clean once in a while. Although, as we explain below, it’s important to dilute it.
It pays to know how to clean a dishwasher to keep everything in good working order and to avoid odors. So, how do the experts do it?
How to clean a dishwasher with vinegar: step-by-step
Hugo Guerrero, a certified House Cleaning Technician at Mattressive recommends following these simple steps.
- Fill a dishwasher-safe cup or bowl with equal parts water and vinegar (about one cup of each) and place on the top rack.
- Run the machine on a normal cycle with no dishes in it, using the heated dry option if your dishwasher has that function.
- When the cycle is complete, wipe away all of the water from your dishwasher and run a second normal cycle without any dishes in it. This will clean out any debris and vinegar that may have been left behind.
White vinegar is a natural deodorizer and disinfectant that will break down food, soap scum, and other residues on the interior surfaces of your dishwasher. Due to its low pH of around 2.5, it is corrosive, so it should be diluted with water and reserved for deep cleaning.
Related video: How to Clean a Dishwasher | Spotless | Real Simple (Dailymotion)
Rubber seals and gaskets can be vulnerable to deterioration if vinegar is left on their surfaces for extended periods of time, so check your manual and make sure you rinse the dishwasher completely after using it.
Cleaning with vinegar is also useful for the removable parts of your dishwasher, so as well as using it on the interior, take out the racks, utensil holder, and filter at the bottom and soak in a mixture of warm water and a cup of white vinegar for around 30 minutes.
‘Run on a hot water cycle to activate the vinegar, breaking down grease, food particles, soap scum, grime, and residue,’ suggests Robert Johnson from Coast Appliances. ‘Don’t forget to air dry the dishwasher after.’
Where do you put vinegar in the dishwasher?
Use the vinegar either in the detergent compartment or in a bowl. Hugo warns against using it in the rinse aid compartment as this could cause corrosion on the heating element, which can lead to leaks and other problems, as well as expensive repairs.
Will vinegar damage your dishwasher?
‘Vinegar may damage some rubber gaskets and cause your dishwasher to leak,’ cautions Michael Davis, a plumbing expert from Plumber Tip. ‘However, if gaskets are made from Viton you could do it more often. Viton is a chemical-resistant material, and the acidity of vinegar won’t hurt it.’
Never use white vinegar with other cleaning agents, such as bleach, as this can be dangerous and could even cause permanent damage to your machine.
How often should you run vinegar through your dishwasher?
Michael Davis suggests using it once a month when you’re cleaning the kitchen – any more than that and he says you might end up damaging the rubbers and causing leaks. You could also save white vinegar for whenever you notice an odor. If you live in an area with hard water, running vinegar through your dishwasher once every couple of months may help to remove stains from minerals in the water.
Improve Wireless Speed with Channels
https://www.asus.com/us/support/faq/1011431/#
How to improve wireless speed by setting Channel Bandwidth in Wireless Router?
What is Channel Bandwidth?
Channel Bandwidth will affect your wireless speed performance and signal stability. In default, ASUS router will adjust the Channel Bandwidth automatically, you could fix it if necessary.
Step1: Connect your computer to the router via wired or WiFi connection and enter your router LAN IP or router URL http://www.asusrouter.com to the WEB GUI.

Please refer to How to enter the router setting page(Web GUI) (ASUSWRT)? to learn more.
Step2: Key in your router’s username and password to log in.

Note: If you forget the user name and/or password, please restore the router to the factory default status and setup.
Please refer to [Wireless Router] How to reset the router to factory default setting? for how to restore the router to default status.
Step3: Go to [Wireless] > [General] >Band (select 2.4GHz or 5GHz), and select the [Channel Bandwidth] you want to use.
a). Band 2.4GHz

b). Band 5GHz or 5GHz-1

c). Band 5GHz-2

Step4: Click [Apply] to save.

How to get the (Utility / Firmware)?
You can download the latest drivers, software, firmware and user manuals in the ASUS Download Center.
If you need more information about the ASUS Download Center, please refer this link.
Reasons for Hope: Developments for Certain Advanced Cancers
Two people share their stories about facing an advanced cancer diagnosis—and one oncologist discusses how research has evolved outlooks for certain patients.
5 Things You Should Know about Capital Gains Tax
Updated for Tax Year 2022 • December 1, 2022 08:27 AM
OVERVIEW
A capital gain occurs when you sell something for more than you spent to acquire it. This happens a lot with investments, but it also applies to personal property, such as a car. Every taxpayer should understand these basic facts about capital gains taxes.
TABLE OF CONTENTS
- Capital gains aren’t just for rich people
- In most cases, your home has an exemption
- Length of ownership matters
Capital gains aren’t just for rich people
Anyone who sells a capital asset should know that capital gains tax may apply. And as the Internal Revenue Service points out, just about everything you own qualifies as a capital asset. That’s the case whether you bought it as an investment, such as stocks or property, or something for personal use, such as a car or a big-screen TV.
If you sell something for more than your “cost basis” of the item, then the difference is a capital gain, and you’ll need to report that gain on your taxes. Your cost basis is usually what you paid for the item. It includes not only the price of the item, but any other costs you had to pay to acquire it, including:
- Sales taxes, excise taxes and other taxes and fees
- Shipping and handling costs
- Installation and setup charges
In addition, money spent on improvements that increase the value of the asset—such as a new addition to a building—can be added to your cost basis. Depreciation of an asset can reduce your cost basis.
In most cases, your home has an exemption
The single biggest asset many people have is their home, and depending on the real estate market, a homeowner might realize a huge capital gain on a sale. The good news is that the tax code allows you to exclude some or all of such a gain from capital gains tax, as long as you meet all three conditions:
- You owned the home for a total of at least two years.
- You used the home as your primary residence for a total of at least two years in last five-years before the sale.
- You haven’t excluded the gain from another home sale in the two-year period before the sale.
If you meet these conditions, you can exclude up to $250,000 of your gain if you’re filing as single, head of household, or married filing separately and $500,000 if you’re married filing jointly.
Length of ownership matters
If you sell an asset after owning it for more than a year, any gain you have is typically a “long-term” capital gain. If you sell an asset you’ve owned for a year or less, though, it’s typically a “short-term” capital gain. How your gain is taxed depends on how long you owned the asset before selling.
- The tax bite from short-term gains is significantly larger than that from long-term gains – as much as 10-20% higher.
- This difference in tax treatment is one of the advantages a “buy-and-hold” investment strategy has over a strategy that involves frequent buying and selling, as in day trading.
- People in the lowest tax brackets usually don’t have to pay any tax on long-term capital gains. The difference between short and long term, then, can literally be the difference between taxes and no taxes.
Capital losses can offset capital gains
As anyone with much investment experience can tell you, things don’t always go up in value. They go down, too. If you sell an investment asset for less than its cost basis, you have a capital loss. Capital losses from investments—but not from the sale of personal property—can typically be used to offset capital gains. For example:
- If you have $50,000 in long-term gains from the sale of one stock, but $20,000 in long-term losses from the sale of another, then you may only be taxed on $30,000 worth of long-term capital gains.
- $50,000 – $20,000 = $30,000 long-term capital gains
If capital losses exceed capital gains, you may be able to use the loss to offset up to $3,000 of other income. If you have more than $3,000 in capital losses, this excess amount can be carried forward to future years to similarly offset capital gains or other income in those years.
Business income isn’t a capital gain
If you operate a business that buys and sells items, your gains from such sales will be considered—and taxed as—business income rather than capital gains.
For example, many people buy items at antique stores and garage sales and then resell them in online auctions. Do this in a businesslike manner and with the intention of making a profit, and the IRS will view it as a business.
- The money you pay out for items is a business expense.
- The money you receive is business revenue.
- The difference between them is business income, subject to self-employment taxes.
Let a tax expert do your investment taxes for you, start to finish. With TurboTax Live Full Service Premier, our specialized tax experts are here to help with anything from stocks to crypto to rental income. Backed by our Full Service Guarantee. You can also file your own taxes with TurboTax Premier. Your investment tax situation, covered. File confidently with America’s #1 tax prep provider.
Simple Trick for Opening Stuck Jars
Duct Tape – wrap half way around top; pull remaining tape to unscrew lid.
Here’s How to Magically Clean Stained Plastic Tupperware.
Picture this; you make a big ole batch of your kids favorite food… spaghetti and meatballs! You make tons extra so everyone in the family can bring leftovers for lunch at school and work. After packing up your kids lunch and sending them on their merry way they enjoy their delicious leftovers that day. You pick them up from school and ask for their lunch containers and one of your kids says “oh I forgot it in my cubby, I’ll grab it tomorrow.” No big deal.
Weeks go by and the container is still in the cubby, and all of a sudden it is a big deal because that was packed in your brand new plastic tupperware container that you just bought. The container finally makes it home and to your surprise- not really- it’s stained and no matter how many suds or scrubs the red stain does not go away. Thankfully TikTok has a trick for this stained container cleaning expert @sromacly shows just how easy it is.
Click here to watch the video.
Okay, first off let me just be the one to say ouch, this stings. It really is this simple huh? My poor wrinkled soggy hands would have loved to know this information when I spent about four days straight trying to scrub my new Snapware container of leftover lasagna.
The woman’s trick is so simple, all you do is grab a paper towel, get it wet with warm water, put a few drops of dish soap on it, place it in your container and… SHAKE SHAKE SHAKE. That’s all, that’s it. It’s clean. Sorta frustrated by how easy this is, and sorta mesmerized by how easy this is.