Shutterfly photo download procedure

https://support.shutterfly.com/s/article/available-image-download-options-1

  1. My Photos
  2. Edit, Organize, & Search

Image Download Options

Dec 19, 2022•CS Knowledgebase

Download from:  My Photos  |  Shutterfly Mobile App  |  Download from Shutterfly Mobile Web  |  Shutterfly Share Sites
We securely store your photos and offer several convenient methods of downloading from our website, or mobile app. All downloads are in JPG format and are either full resolution or high resolution as specified below. In addition to JPG, we accept HEIC (via the iOS app only), PNG, BTM, and BMP image file formats and convert them to JPG at upload.

Note: Downloaded photos do not include any edits made using our online tools, such as cropping, color effects, or red eye removal.

Download from My Photos
You can download photos one at a time or in batches. Single photo downloads are saved to your computer immediately. Multiple photo downloads will be sent via a link to a zip file (or files) containing your selected images to the email address associated with your account.

  To download a single image from My Photos: 

  1. Click the image you wish to download (it will now be highlighted with an orange border).
  2. In the top black action bar, click “Download” (cloud with a downward pointing arrow).
  3. Additionally, from Full Image View, you can click the “Download” button (cloud with a downward pointing arrow) and receive your file instantly.

Screenshot example of the download steps from My Photos

To download multiple images from My Photos:

  1. Select a set of photos and/or videos (up to 500).
  2. Click the “Download” icon in the black action bar along the top of the page (cloud with downward pointing icon).
  3. You will receive an email from Shutterfly with a link to download a ZIP file – or several, depending on the quantity – containing the selected photos and/or videos.
  4. Click the link and save the file to your computer. Open the file with WinZip (or other compatible program) to extract the files and save them to your computer.

(Back to Top)
Download from Shutterfly Mobile App
You can download photos from your account to your mobile device one at a time via the Shutterfly app. App downloads are a high resolution file (1600×1200), suitable for viewing, sharing, or printing up to 8×10. Full resolution downloads can be obtained through the website. See Download from My Photos above.


Download from Shutterfly Mobile Web
To download an image from your Shutterfly Account on the mobile web browser, you will need to access your My Photos. The next steps depend on your Device. 

To download an image from an Android Device on the Mobile Web:

  1. In the Photos Section, select the photo you would like to download to enlarge the image. 
  2. Tap the 3 dots in the upper right-hand corner.
  3. Tap Download. 
How to Download an image from an Android Mobile Web

To download an image from an Apple Device on the Mobile Web:

  1. In the Photos Section, tap the plus (+) on the photo you would like to download to enlarge the image. 
  2. On the bottom menu bar, tap download. 
How to Download an image from an Apple Mobile Web

(Back to Top)

Download from Shutterfly Share Sites
Share Site photos can be downloaded one at a time from Share Sites you own or are a member of (subject to permission levels and site settings). are a high resolution file (1600×1200), suitable for viewing, sharing, or printing up to 8×10. Full resolution downloads of images in your Shutterfly account are available through the website. See Download from My Photos above.
To download an image from a Shutterfly Share Site:

  1. View a picture on a Shutterfly Share Site; click the thumbnail to view the full-size image.
  2. Hover over the pencil in the upper right-hand corner to see a drop-down menu, shown below.
  3. Click the “Download picture” option in the drop-down menu. You will be prompted to sign into your Shutterfly account if you are not already. A 1600×1200 copy of the picture will be downloaded to your computer.


Note: If you do not see the option to ‘Download Picture’ from a Share Site, the owner has disabled this feature.


Download an Image from Share Sites

Transfer photos from phone to computer

On both Windows and macOS, you may have to put your phone in file transfer mode once it’s connected: To do this, open up Settings on your Android device, then pick Connected devices, USB, and File transfer.

 Recommended video

You can use apps such as Dropbox to wirelessly beam photos and videos from an Android phone to a computer, but again, you’ll have to pay for cloud storage space once you hit the free limit—which is 2GB for Dropbox. 

How to transfer photos from Android to Windows

Connect your Android phone to your Windows 10 or 11 computer with the appropriate USB cable, and your phone should show up in File Explorer (and start charging at the same time). If your phone isn’t appearing in the left-hand navigation pane in File Explorer, click This PC to see a list of drives and devices, and you should be able to find it there.

You can then browse your Android smartphone just as you would any other folder on your Windows system. The photos and videos are typically stored in a folder called DCIM, so you can move them to your computer however you like: drag and drop, Ctrl+C and Ctrl+V, or the copy (two rectangles) and paste (a clipboard and a rectangle) icons in the File Explorer toolbar at the top.

You can also right-click on the name of your phone in File Explorer, then choose Show more options and Import pictures and videos to move files across. You can pick and choose which photos and videos to copy, or you can just grab everything. By default, the files go to the Pictures folder in your Windows user account, but it’s possible to change this by selecting More options.

We’d recommend keeping your photos and videos backed up in a third location (besides your phone and computer) on an external drive, just in case. There are plenty of third-party applications to pick from, but Windows also has the built-in File History backup tool—you can search for it and launch it from the Start menu.

How to transfer photos from Android to macOS

To get Android and macOS talking to each other, you’ll need a small, free software tool from Google called Android File Transfer. After downloading the package, drag the Android File Transfer app icon to the Applications folder, and you’ll be able to launch it from the Applications screen in Finder or through Spotlight (Cmd+Space).

As it’s a new program freshly downloaded from the internet, you’ll get a pop-up dialog asking you to confirm that you want to run it. Once you do, connect your Android phone to your Mac computer with the appropriate USB cable. You should then see a pop-up window asking if you want to allow the “accessory” (your phone) to connect to macOS, so choose Allow to continue.

Now, you’ll be able to move all your media files off your phone and onto your Mac. As always, we recommend you back up your photos (and other data) in a third location like an external hard drive, for added safety. It’d be tragic to transfer everything just to lose it from a hard drive crash.

How to tell if someone is stealing your WiFi and how to kick them off

How to see if someone is using your Wi-Fi

Even if your Wi-Fi network works flawlessly, it is still a good idea to see whether someone else is using your Wi-Fi from time to time. As a rule of thumb, you should have a password-protected Wi-Fi network at home. Also, only your devices should connect to it. That means all the gadgets your family uses. And the devices from friends that get on your Wi-Fi periodically.

To see all the devices connected to your home Wi-Fi, you must load the router app you might have used the first time you set up your Wi-Fi. Or the last time you changed the password.

You’ll need login credentials for this step, usually found on the router itself. If you changed the default password, you might have the new one stored in a password manager. Or maybe you know it by heart.

The bottom of the router will also contain an address that lets you connect to the device. You’ll have to load that up in a browser if your router doesn’t have a companion app. Log in, and then look for menus that mention “connected devices,” “wireless clients,” or anything of the sort.

As SlashGear points out, now comes the hard part. If you have many Wi-Fi gadgets on your network, it might be challenging to identify some of them. That’s because not all of them will have easy names like “iPhone” or “iPad.” Even if they do, you might have multiple devices connected to the network simultaneously.

This is the tedious point where you’ll have to determine what everything is. One way to do it is to turn the Wi-Fi off on all devices, no matter how much resistance you get from family members. Refresh the router tab or app to access the list of connected devices. Your computer might be the only device that’s still on Wi-Fi.

Anything else that’s still connected is probably a device from a neighbor stealing your Wi-Fi. Or several devices, as the person could connect all their Wi-Fi gadgets to your network once they have the password.

How to kick someone off your Wi-Fi network

Now comes the second part of your quest. Once you’ve found the culprit, you can go ahead and kick them off your home internet.

The simplest thing to do is to go to a different menu of your router management app. You’ll be looking for wireless settings or wireless security. And you’ll look for an option to change the password. Type the old password, and then type the new one. Save everything and wait for the device to apply the changes.

After that, you will have to reconnect all your Wi-Fi devices using the new password. You’ll want to make sure you remember this one. Once that’s done, you should be in complete control of Wi-Fi access.

There’s another way to solve the problem, per SlashGear. It involves kicking off the intruder from your Wi-Fi without changing your password.

Once you’ve identified your Wi-Fi devices, you’ll want to save the MAC addresses of each gadget you wish to connect to the network. In the router’s management app, you’ll want to find an option to filter MAC addresses. In there, you will insert all the MAC addresses that are allowed to connect. Each Wi-Fi device will have a unique MAC identifier.

After this step, only your gadgets will connect to your Wi-Fi network. Your neighbor will get connection errors, even if they still know your password. They’ll be effectively kicked out.

One more key Wi-Fi trick

The downside is that you’ll have to perform the same filtering task for your friends and extended family members who come over and want Wi-Fi access. A solution for that is setting up a separate guest Wi-Fi network that you only give to your visitors. Also, a guest Wi-Fi network comes in handy when neighbors want temporary access. You’ll be able to disable it once the agreed period expires.

Whatever version you decide to use, you’ll soon get rid of unwanted devices on your Wi-Fi network. The MAC filtering trick also is a sneaky way to turn off internet access to your kids’ gadgets.

Finally, if your Wi-Fi continues to experience connection and speed issues after you’ve cleaned it up, there’s a different problem you need to fix. You can upgrade the hardware or chat with your internet service provider about your connection.

Is Someone Spying on You?

https://www.msn.com/en-us/news/technology/quick-check-to-make-sure-no-one-is-spying-on-your-computer/ar-AAW1ObN?cvid=076f30f0c58d4ae387da3bfe83b27bd1

Quick check to make sure no one is spying on your computer

Afew decades ago, the average Joe didn’t have to worry about spies poking around their private life. Thanks to the internet, you now have to worry about spies snooping on your computer, tablet and smartphone. That’s why we’re sharing a few ways to ensure no one is spying on your computer.

Quick check to make sure no one is spying on your computer© Provided by Komando

Modern malware makes it easy for criminals to infiltrate your device. Tap or click here to remove malware from your computer. Troubleshooting can take a good chunk of your time, though.

That’s why you should first check for spyware on your machine. Luckily, we have a few valuable tips you can use to find out if someone is spying on your computer. Follow this simple guide to stop spies, creeps, and stalkers from monitoring you.

1. Check your apps through the Task Manager or Activity Monitor

It can be challenging to tell if someone is spying on your device. Spyware isn’t as direct as ransomware, which whips you into a frenzy so you feel forced to pay for your files back. Here are five essential steps to protect your computer from ransomware.

Spyware is subtle in comparison. It hides in your system, keeping track of everything you do. A program that spies on your computer can even hijack your webcam or microphone.

You should check your Task Manager if you’re on a PC or your Activity Monitor if you’re on a Mac. They give you an overview of all the apps running on your device. You can look over the list of apps and see which ones are slowing things down.

Checking your speed is an easy way to sniff out spyware

A sluggish computer is a dead giveaway that someone’s hitching a ride on your system. If it suddenly slows down, try to investigate the issue. Sure, maybe the slowdown is due to an innocuous reason like clutter. But you don’t want to take the risk.

Malware tends to use up a lot of resources. It’s designed to run your system dry, which means your programs can start to lag. Your computer will start working overtime to handle these unwanted programs, which means your device may begin to heat up.

PC users: Follow these steps

Check the Task Manager to see the processes your computer is running. Just hit CTRL + SHIFT + ESC to open the Processes tab. Here you’ll see how many central processing units each program uses.

You might see a program that uses almost 100% of your CPU. If you don’t recognize the name, do some research to see if it’s a legitimate app. Then, reset it. If you notice performance decrease again, you just found your spyware app.

Mac users: Follow these steps

Check the Activity Monitor to see the processes your computer is running. Just hit Command + Spacebar to open Spotlight Search. Then, type Activity Monitor and press Enter. If you see an app that uses too many resources, look it up, reset it and see if your performance decreases.

Maybe you checked the Task Manager or Activity Monitor and didn’t find anything. In that case, here’s another way to make sure no one is spying on you.

RELATED: Sneaky new malware avoids detection – How to check your computer

2. Be on the lookout for programs that start randomly

Always be on the lookout for strange activities. For example, if an app launches itself out of the blue, don’t write it off. You may think, “Maybe I accidentally clicked on it?” or “It could be a bug.” Don’t give any strange behavior the benefit of the doubt. Take it as a warning sign.

Let’s say you forbid all apps from opening upon startup. If a window briefly appears before flicking out of existence, that’s a sign that a spyware program is loading itself. They’re designed to disappear, so you don’t notice them, but they might accidentally show themselves in this way since they need to load.

That’s why heading to Task Manager on a PC or Login Items on a Mac is helpful. They let you look over every app on your computer. Think of these programs as ingredient lists on the side of a food package. You can root out the bad stuff for your health or, rather, your computer’s health.

Here’s how to change startup apps on a PC:

  • Click the Start menu.
  • Select Settings (cog icon) and click Apps.
  • In the left menu, click Startup. It should be the last option.

The Startup panel displays all the apps installed on your machine. If Windows has measured the impact of that app on your PC, you will see a rating next to it. Options include No impact, Low impact, Medium impact, and High impact.

An app with a high impact can slow down your startup time. Go through the list and determine which apps you don’t need immediately after startup. Toggle each slider next to the app to turn it on or off.

Here’s how to change startup apps on a Mac:

  • Click on the Apple menu and navigate to System Preferences.
  • Click Users & Groups.
  • Select your User Account, then click Login Items on the top right.

Here you’ll see a list of the applications that open automatically when you log in.

To prevent an app from running automatically, click Remove a login item. Then select the app’s name that you want to block and click on the Remove button below the list.

You can use the checkbox to hide items you still would like to launch. To add a new item, hit the plus symbol under the list and find it on your computer.

Here are a few other ways to identify unwanted programs.

3. Update your devices regularly

Another good way to ensure no one is spying on you is to keep your computers updated. We get it: Constantly updating them can be a drag. But it’s worth it for the sake of longevity.

If you want your computers to last, you must ensure they’re safe. And the easiest way to protect them is by taking advantage of the ever-evolving security tools that come out for free updates.

Cybersecurity experts are always keeping their ears to the ground. They know about the latest hacks, exploits and more. Thus, they’re always working hard to fix these issues.

They release these fixes in updates, so you’re missing out on essential protection if you don’t upgrade your system. Tap or click here for a few emergency updates that anyone with Apple devices should know about.

To update your Mac:

Click the Apple icon from the menu bar at the top of the screen and click System Preferences > Software Update.

To update your PC:

Click the Start Menu and open Settings, click Update & Security, then click Windows Update. From there, you’ll be able to see if updates are available for download. If an update is available, click Download and Install. If you don’t see an available update, click Check for Updates to force the process.

Arizona’s 5 Best Ghost Towns

https://mwg.aaa.com/via/places-visit/arizona-ghost-towns?ajs_uid=736e910e2a3f0594d99694d096d2b36b&activity_id=EMC_MSHP_Newsletter_AZ_100922

Explore these abandoned towns around the state.

By Keridwen CorneliusPublished September 29, 2022

A wooden sign over the road in Vulture City ghost town in Maricopa County, Arizona.
Vulture City ghost town in Maricopa County, Arizona.

From an eerily abandoned copper mining outpost to a deserted camp where visitors can stay the night, these time-capsule towns offer a fascinating view of Arizona’s bygone days.

Oatman

Sometimes called a “living ghost town,” this Route 66 town in Northwestern Arizona is home to around 100 people. But that’s a nugget of its population in the 1920s and 1930s, when 10,000 people wandered the dusty streets. Thanks to repeated gold strikes between the 1860s and 1910s, this boomtown received influxes of prospectors and businesspeople. But like many mining towns, Oatman suffered the vagaries of ore prices, and during WWII, the mines were deemed non-essential to the war effort and closed. For a while, the Mother Road helped Oatman thrive as a tourism hotspot. But in the 1950s, when Interstate 40 bypassed Oatman, the town was left in the dust.  

Still, Oatman is worth a visit for its fascinating cast of characters. Clark Gable and Carole Lombard honeymooned here at the Durlin Hotel, now called the Oatman Hotel, and travelers can visit the bar, restaurant, onsite museum, and honeymoon suite. Every day, crowds gather in the street to watch the Oatman Ghost Rider Gunfighters act out a heist and shootout. And the most popular locals are the wild burros, who are descended from donkeys brought to town by miners and now wander the streets like they own the place.

Inside living quarters in a historic building in the Vulture City ghost town in Arizona.
Inside a building in Vulture City.

Vulture City

Vulture City is filled with photogenic rusty trucks, weathered wooden buildings, and rumored paranormal activity, set against a backdrop of saguaros. This settlement near Wickenburg was established during the Civil War to support Vulture Mine, Arizona’s most productive gold mine. The population quickly swelled to 5,000. But when World War II broke out, the mine was shuttered to ensure resources were directed toward military efforts. The town was soon abandoned.    

Today, some of the stone edifices and artifacts have been faithfully restored. Visitors can safely poke around the ​​assay office, cookhouse, brothel, post office, and prospector Henry Wickenburg’s original home on a self-guided tour or a seasonal (mid October through mid May), weekend guided tour. General admission for all visitors is $15 per adult.

Swansea

Rocky, rough, and punctuated with piles of mine tailings, the road into Swansea feels as forgotten as this now-deceased town. In the 1860s, copper mining started in this barren part of Western Arizona’s Buckskin Mountains. The subsequent settlement was named after Swansea, Wales, which was both the hometown of founder George Mitchell and the destination where Arizona’s refined ore was shipped. 

In the early 1900s, a railroad brought buzzing activity to this remote outpost. The 750-or-so residents frequented Swansea’s saloons, barbershop, auto dealership, and moving picture house. But the mining companies began to sputter, and the Great Depression sounded the death knell for Swansea. Today, the town is preserved by the Bureau of Land Management. Visitors can stand atop grate-covered mine shafts, see an earthquake-damaged smelter, and roam around the workers’ cottages—shells of buildings where, shockingly, up to six miners shared the tiny space.

Signed dollar bills line the walls behind the bar at Superstition Saloon & Restaurant.
Signed dollar bills line the walls at Superstition Saloon & Restaurant.

Tortilla Flat

Just down the road from stunning Canyon Lake, where standup paddleboarders and Dolly Steamboat riders cruise between golden cliffs, lies Tortilla Flat, population: six. Established in 1904 as a freight camp for laborers constructing Roosevelt Dam, the town has served as a stagecoach station and lunchtime pit stop for President Theodore Roosevelt. Located an hour from downtown Phoenix, this leisurely outpost is popular with day trippers looking for a Western vibe and watery adventure. 

At the Superstition Saloon & Restaurant, diners can hop onto saddle bar stools and sip sarsaparilla while feasting their eyes on the estimated $350,000 worth of signed dollar bills papering the walls. For dessert, pop into the Tortilla Flat General Store for a prickly pear gelato and mosey down the boardwalk. Then head to the mini museum to learn about the town’s colorful history, from fires to filmmaking.

Kentucky Camp

Nestled in the “sky island” mountains north of Sonoita, Kentucky Camp offers a rare chance to spend the night in an abandoned ghost town. The U.S. Forest Service rents a restored adobe cabin onsite, giving guests an intimate experience with deserted buildings set amidst the silence of the grasslands and the grandeur of a star-filled sky.   

After gold was discovered in the area in 1874, around 500 miners rushed in, depleting the deposits within a decade. In 1904, Kentucky Camp was built as the headquarters of the Santa Rita Water and Mining Company, which aimed to employ hydraulic gold mining to extract more ore. But the venture fizzled out when, a year later, the camp’s designer and chief engineer mysteriously plummeted to his death from a window in Tucson. Today, visitors can explore the restored headquarters building, relax on the porch, and mountain bike or hike along the Arizona Trail.

UP NEXT:Driving Haunted Route 66

Airline Customer Service Dashboard

https://www.transportation.gov/airconsumer/airline-customer-service-dashboard

The U.S. Department of Transportation has created a dashboard to ensure the traveling public has easy access to information about services that U.S. airlines provide to mitigate passenger inconveniences when the cause of a cancellation or delay was due to circumstances within the airline’s control. A green check mark on the dashboard means an airline has committed to providing that service or amenity to its customers. A red “x” means the airline has not made that commitment. However, airlines with a red “x” may provide these services and amenities in some instances in their discretion.

https://explore.dot.gov/views/AirlineCustomerCommitments/AirlineCustomerCommitments?:embed=y&:isGuestRedirectFromVizportal=yFviews/AirlineCustomerCommitments_MH10/AirlineCustomerCommitments?:embed=y&:showVizHome=no&:host_url=https://explore.dot.gov/views/AirlineCustomerCommitments/AirlineCustomerCommitments?%3Aembed=y&%3AisGuestRedirectFromVizportal=yF&:embed_code_version=3&:tabs=no&:toolbar=no&:showAppBanner=false&:display_spinner=no&:loadOrderID=0

Please click this link to download an accessible version of the dashboard.

These ten large U.S. airlines and their regional operating partners, which operate flights for them but do not sell tickets, account for approximately 96 percent of the domestic scheduled passenger air traffic.

Use the above dashboard to learn about the amenities that the U.S. airline that you are flying on has promised to provide should there be a controllable flight cancellation or delay. You can also use the dashboard to compare amenities that the airlines commit to provide in the event of a controllable flight cancellation or delay when deciding which airline to fly.

A controllable flight cancellation or delay is essentially a delay or cancellation caused by the airline. Examples include: maintenance or crew problems; cabin cleaning; baggage loading; and fueling.

Airlines are required to adhere to the promises that they make in their customer service plan, including commitments to care for customers in the event of controllable delays or cancellations. The Department will hold airlines accountable if they fail to do so.

Remember these commitments do not impact your entitlement to a refund. If an airline cancels a passenger’s flight or makes a significant change in the flight, regardless of the reason, airlines are required to provide a prompt refund to a ticketed passenger, including those with non-refundable tickets, should the passenger choose not to accept the alternative offered, such as rebooking on another flight. Learn more about your right to a refund. If you have a problem obtaining a refund that you believe that you are entitled to receive, you may file a complaint with the DOT.

See below for detailed information about airline customer service commitment plans.

Airlines’ Customer Service Plans

How to fix audio problems on your Windows PC

https://www.pcworld.com/article/491036/how-to-troubleshoot-audio-problems-with-your-pc.html?huid=76887c5a-a2c3-4cc5-bb6f-0c3759430042

For all its positives, Windows sometimes acts in unexpected ways—like a sudden lack of audio. If your computer abruptly stops playing sound, try these easy steps to fix the issue:

No sound in one app

  1. First, reboot your computer.
  2. Confirm the program’s volume isn’t turned down or muted. In browsers like Chrome and Firefox, each tab can be muted individually—right-click a tab to see its status. (The option will say “Unmute tab” if currently silenced.)
  3. If you still can’t hear anything in this program, try uninstalling and reinstalling it. Before doing so, first back up any data and/or write down how your settings are currently configured, as applicable.Note: For paid software, your license for the program may be tied to a specific version—if that’s the case, you may need to do a little hunting to find its installation program on the vendor’s website. This same advice applies if you just prefer your version of the app over the current one.

No sound at all

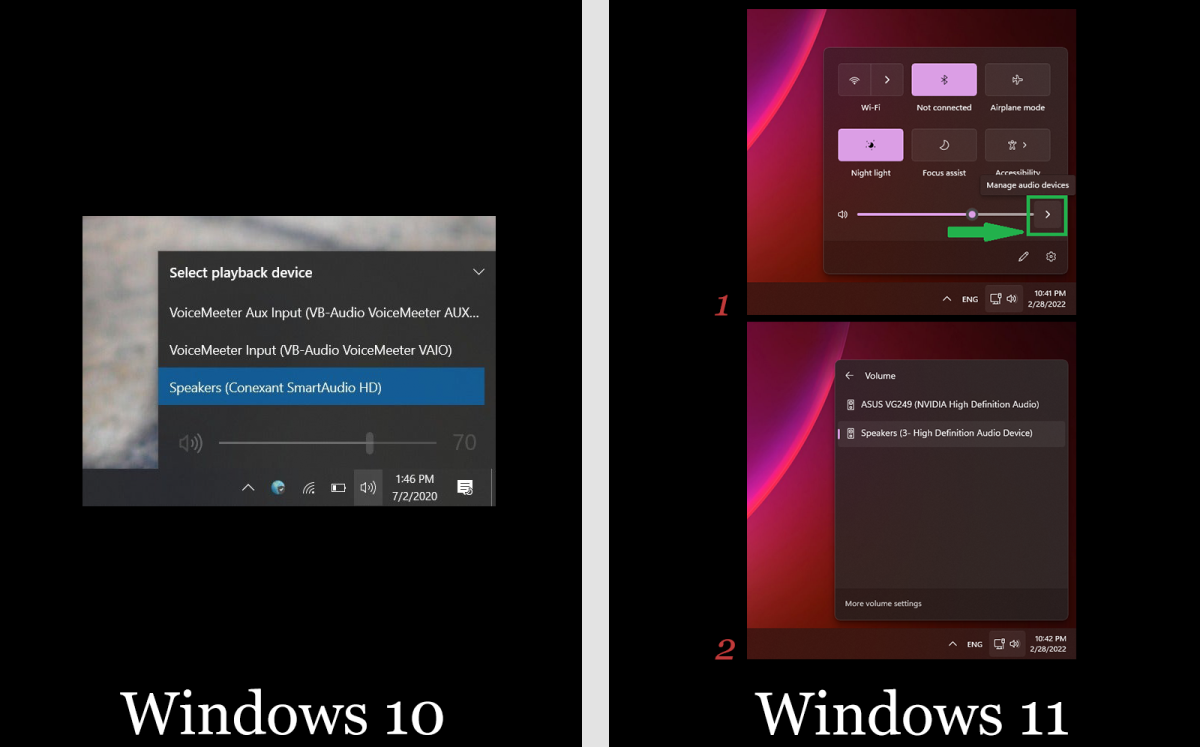
Playback device selection in the Windows taskbar for Win 10 and Win 11
First thing to check: The audio output device. Windows can sometimes change it to a different source unbeknownst to you. (To view this image full-size, right-click on it and choose “Open in new tab.”)

PCWorld

  1. First, check to make sure Windows is using the correct device for speaker output by clicking on the speaker icon in the taskbar. (Sometimes Windows will switch output to a different device, unbeknownst to you.) At the top of the pop-up window, you’ll see the name of the speaker currently in use—e.g., Speakers (2-Anker PowerConf). Click on that name to switch to the proper device, if applicable. If using external speakers, make sure they are powered on.
  2. Reboot your computer.
  3. Verify via the speaker icon in the taskbar that the audio is not muted and is turned up.
  4. Ensure that the computer isn’t muted via hardware, such as a dedicated mute button on you laptop or keyboard. Test by playing a song.
  5. Right-click the volume icon and click Open Volume Mixer. Ensure that all options are on and turned up.
  6. Internal speakers still not working on your laptop? Plug headphones into the audio jack and test again. If the headphones work, remove them to continue troubleshooting the internal speakers.
  7. For desktop systems with speakers plugged into the 3.5mm jack, try a USB speaker or USB headphones. (Or visa versa.) If the alternative device works, remove it to continue troubleshooting the initial set of speakers. (See our roundup of best budget computer speakers if you are in need of a new set.)
  8. Right-click the volume icon again and choose Open Sound settings (Windows 10) or Sound settings (Windows 11). For Windows 10, find Related Settings in the window that opens, then click on Sound Control Panel. For Windows 11, scroll down to the Advanced section of the window that opens, then click on More sound settings. For both operating systems, a new, smaller window labeled Sound will appear. Click on the Playback tab, and then confirm that your audio device (likely “Speakers”) has a green checkmark next to it. Then click Properties and make sure that Use this device (enable) is selected.

If your sound still doesn’t work by this point, you may have a missing or corrupt driver for your audio controller.

  1. Uninstall the driver. Open the Device Manager (type device manager in the taskbar search box), go to Sound, video and game controllers, select the audio controller for the device that’s malfunctioning, and press the Delete key.
  2. Reboot the system and allow Windows to reinstall the driver, which it should do automatically. If it doesn’t, download the driver from your PC maker’s site or audio card manufacturer’s site, and reinstall it manually.

Author: Alaina Yee, Senior Editor

Alaina Yee is PCWorld’s resident bargain hunter—when she’s not covering PC building, computer components, mini-PCs, and more, she’s scouring for the best tech deals. Previously her work has appeared in PC Gamer, IGN, Maximum PC, and Official Xbox Magazine. You can find her on Twitter at @morphingball.

Recent stories by Alaina Yee:

Local Locksmith

I just want to say that Bob Danelz, SaddleBrooke Locksmith, is awesome. He lives in SaddleBrooke and is a true asset. I work for Beth Fedor, Realtor and we had a situation where the locks needed to be rekeyed ASAP so I called Bob. 520.444.3351. He went over first thing this morning, rekeyed the locks and did a perimeter check only to find that one of the sliding doors had been left unlocked so he checked all doors and windows before leaving the home to ensure it was secure.

Some Intel CPUs are breaking Chrome and Edge — here’s what you can do

© Provided by Tom’s GuideIntel Alder Lake mobile CPU promo image

Intel is aware of the issue and posted about it on its website. The company says that recent Intel UHD Graphics 770 drivers for Alder Lake CPUs are causing Chromium-based browsers to “lag severely.” Browsers behave as if they’re “semi-frozen,” with click response times as slow as two seconds. Scrolling is also “delayed and choppy.” 

Intel said the issue can happen by opening many tabs at once or scrolling and clicking around. Using a mechanical hard disk drive (HDD) also causes problems.

So far, this problem is linked to machines with both Alder Lake CPUs and UHD Graphics 770 integrated GPUs. Eighteen desktop and laptop CPU models released between late 2021 and early 2022 are directly affected. This ranges across the i5 through i9 lines. There’s a full list of models with UHD 770 integrated GPUs that you check out to see if you’re at risk.

Intel details how affected users can resolve this problem, suggesting users update the browser and Windows to their respective latest versions. Users should also update the graphics driver with a clean install, along with disabling hardware acceleration on the browser or switching from an HDD to an SSD.

We expect issues to pop up with new tech, but this particular problem seems especially troublesome. After all, Chromium browsers — specifically Google Chrome — are the most widely used on Earth. Unlike AMD CPUs slowdowns in Windows 11, you’ll actually see these slowdowns since you’d only notice the latter if you were looking at your CPU speeds. 

Hopefully, Intel rolls out a fix sooner rather than later. The company certainly doesn’t need this hanging over its head before the global launch of its Intel Arc Alchemist desktop GPUs, which are expected to arrive in late summer.