Start tapping the Esc key BEFORE starting the PC and then press the start button. Keep tapping the Esc key until a popup menu shows. Then pick Set Up from that popup menu, F9. If the USB is bootable, it will show in the menu. Make the USB the first item and then save.
It should then boot from the Linux Mint Live. BTW: you are doing the best way I would recommend, when asked – just make sure there is media attached IE: external hard drive or BIG capacity USB drive to hold the files that are being saved from the failed hard drive.
Don’t miss out on the exclusive deals in our Webshop!
The Unique ID is, a unique set of numbers associated to each account. This ID is generated at the moment you begin playing the game and remains the same while the account is active, whether Facebook or other services are linked or not, serving as an identification of the user. This also helps us track any accounts, which will ultimately make sure we can more quickly and efficiently help you resolve your issues 🙂
In this article we’ll let you know how to find your ID through your mobile device.
Here’s how you find it through 8 Ball Pool:
1. Open your game and at the top right you will see your Nickname and avatar/profile picture.
Click on the Avatar as shown below. If you tap on your nickname, make sure to select Profile on the top right part of the screen.
2. Once you click on it, your Profile Page will pop-up, showing your currency, achievements, total amount of winnings and other details, including your Unique ID.
Tap on the icon right next to the ID to automatically copy it!
That’s it! Once you have it, always make sure to include it in your emails to the Player Experience team 😊 You should also make a note of your Unique ID, in case you lose access to the account or there is a technical outage.
You can be a seasoned Windows user, but you may still not know every shortcut available. For example, earlier this month I learned a new keyboard shortcut I hadn’t known before. It was so simple and obvious, yet felt like a complete secret until that moment.
I also discovered that there are a whole lot more I’ve been sleeping on.
The original tip came via Twitter (now known as X) courtesy of Jen Gentleman, a Windows engineering team member at Microsoft. But the help doesn’t stop there. She very generously has an pinned to the top of her feed, too. I eagerly jumped down that rabbit hole and came away with a solid list of new shortcuts to incorporate into daily use.
To save you time, I’ve shared my favorites below. They work in both Windows 10 and 11. If you like them, be sure to check out Gentleman’s Twitter account—not only do you get helpful Windows tips, she posts spot-on internal monologues about video games, too. (I feel pretty deep in my soul.)
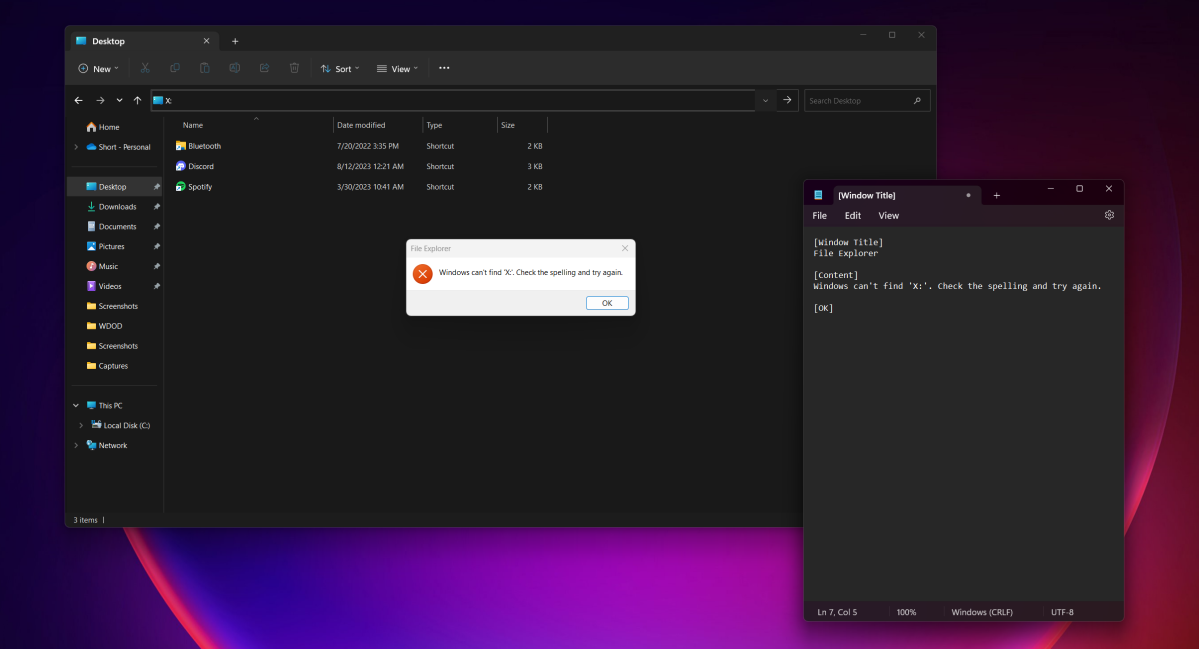
1. Copy text from a Windows dialog window
PCWorld
Running up against an error message in Windows? No need to painstakingly transcribe the error code. Instead, when the pop-up is the active window, hit Ctrl + C on your keyboard, then paste the text into a document. The whole message is copied, so you can extract whatever parts of it you want from the text dump.
2. Switch to the correct app window fast
If you have more than one window open for an app, you can hover your mouse over the program’s icon in your taskbar, then choose the correct window—provided you can make out which one it is from the tiny preview.
An alternative that’s just as fast? Hold Ctrl and then click on the app’s icon. You’ll cycle through all its open windows. I now use this exclusively when flipping between two open windows. It’s as efficient as alt+tab, but app-specific.
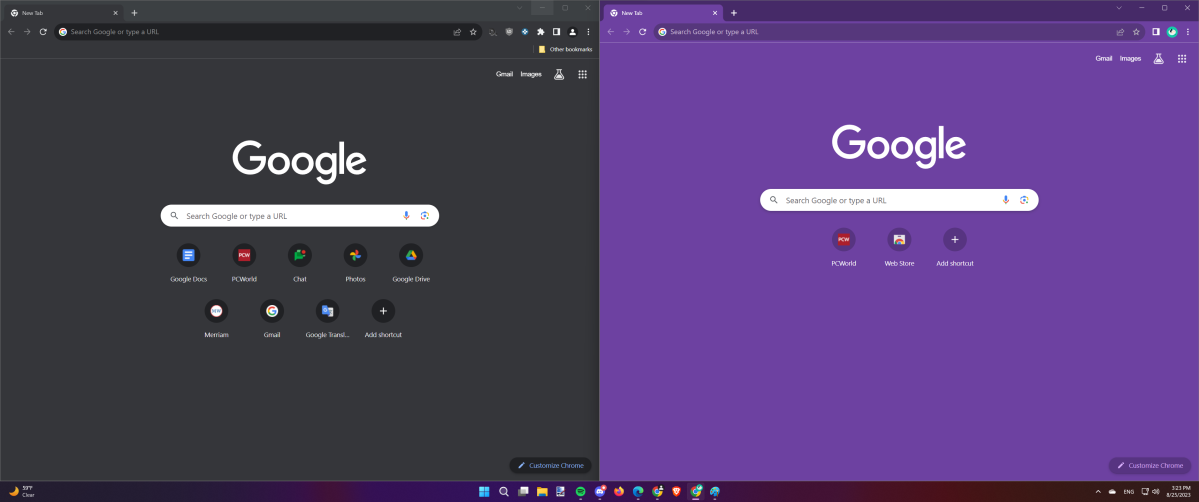
3. Open a new instance of an app
Two different instances of Google Chrome open in Windows 11—the left is loaded with the main profile, and the right was started up with a secondary one.
PCWorld
Turns out if you hold Shift while clicking with your mouse on a taskbar icon, it opens a new instance of that app. That is, running the program a second time or more. It’s slightly different than opening a new window—for example, a second instance of Chrome lets you load a different profile while the first one is logged in. Or having two text files open at the same time in Notepad.
You can middle-click on your mouse to execute this same command, too—that’s probably your scroll wheel if you have a modern mouse.
4. Make Windows UWP apps fullscreen
While pressing Win + the up arrow key will maximize any window, it doesn’t make the application full screen. For apps you install through the Microsoft Store app (aka Windows UWP apps), you can make them full screen by tapping three keys: Win + Shift + Enter.
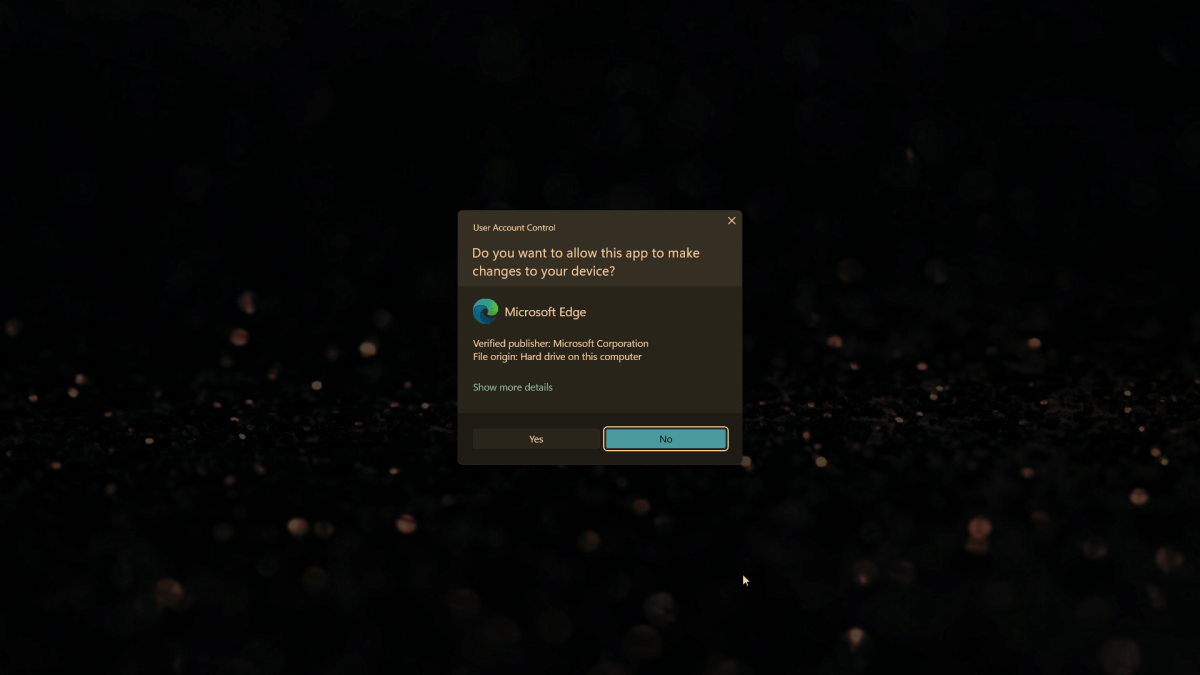
5. Run apps with elevated permissions
You shouldn’t ever need to run Edge with elevated permissions, but you can.
PCWorld
By default, apps don’t run with admin permissions, a security measure that restricts how a program can behave within Windows. For example, the KeePassXC password manager can’t access 2FA hardware keys (like a Yubikey) plugged into a PC when opened normally.
To quickly launch software with elevated permissions, just hold Ctrl + Shift while double-clicking the app to open it. No need to right-click on the program’s icon or shortcut and then choose to run as admin.
6. Open a new window for an app
Every app on your taskbar has a number assigned to its position—at least, for the first 10. You might already know this and make use of the keyboard shortcut that lets you open apps (or jump to them, if already open) pinned to your taskbar: the Windows key plus a number from 0 through 9.
But did you know if you hold Win + Shift and then the number you want, a new window for that app will open? This one isn’t universal (the software has to support this shortcut), but for those that do, it’s a fantastic time saver.
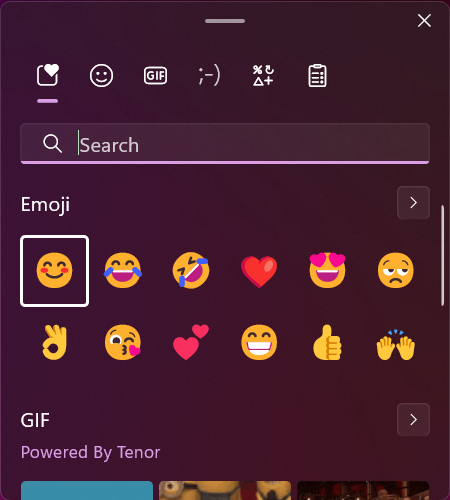
7. Quick access to emoji (and kaomoji!)
PCWorld
Want to insert an emoji (or more importantly, a kaomoji) into whatever you’re typing? Skip the online search and instead press Win + ; or Win + . on your keyboard. It brings up Windows’ on-screen emoji keyboard, which includes a kaomoji keyboard and special characters keyboard, too. Windows 11 also gets a GIF keyboard and direct access to the clipboard. ╰(*°▽°*)╯
8. Fix a black screen
Did your screen suddenly go blank, even though your PC was behaving normally beforehand and still continues to run? You don’t need to hard reboot immediately. Instead, first try pressing Win + Ctr + Shift + B on your keyboard. Windows will know you’ve encountered a black screen and will try to fix it for you.
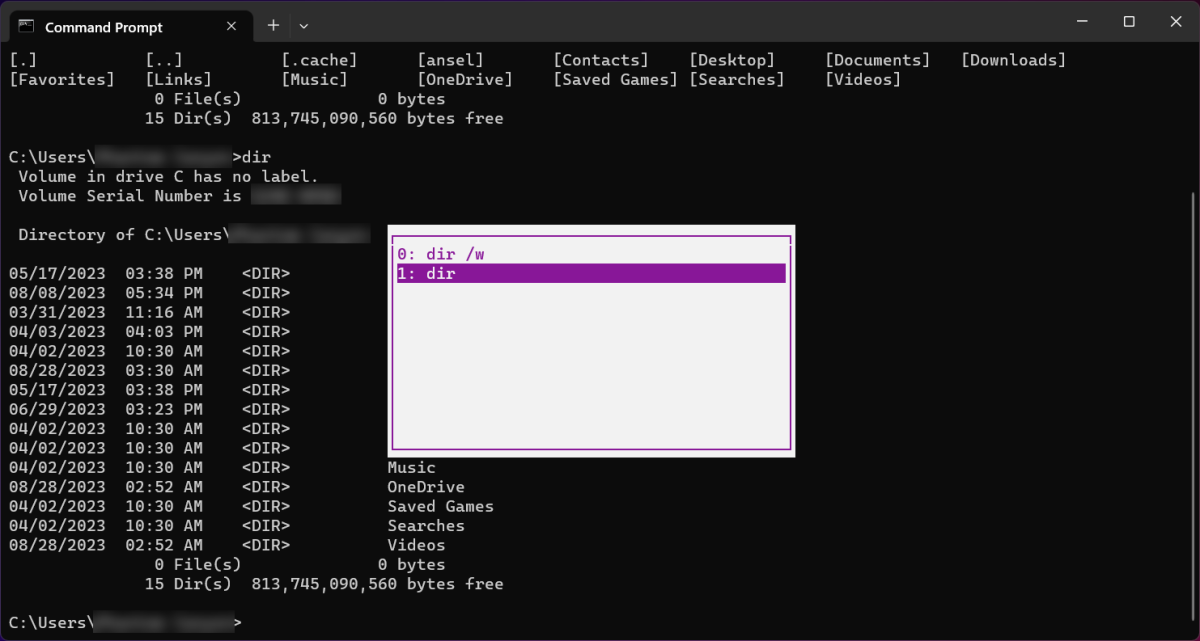
9. Access your Command Prompt history
YESSSSSS.
PCWorld
Turns out the Command Prompt (aka cmd) keeps a history, and you can call it up to see what commands you ran—and rerun them from that menu. All you do is tap F7 on your keyboard.
No lie, my face rivaled that meme of in The Office when I tried this one out. I love it.
10. Open file properties instantly
You could right-click on a file to access its properties, but why go through all that trouble? Instead, hold down Alt while double clicking on it. It’s lighting fast.
11. Reboot straight to Windows’ troubleshooting menu
PCWorld
Sometimes your PC acts up, and you need to use Windows’ heavy-hitting troubleshoot options like safe mode, startup repair, and system recovery. You can access them during boot by pressing F8 during startup—or more simply, holding Shift before choosing to restart your PC from the Windows power menu.
12. Reorder items in a list
Okay, this one is a bit of a cheat—it’s a Microsoft Word shortcut, though Google Docs also supports it. But as someone who uses bulleted lists in documents often, I couldn’t resist highlighting this one from Jen Gentleman’s list, too. To reorder items in a bulleted or numerical list, just highlight it, then hold Shift + Alt while using the Up or Down arrow key.
So efficient.
Bonus: 7 additional helpful Windows shortcuts
As mentioned, a whole slew of Windows shortcuts exist. You’ll see some of the keyboard variety get mentioned often in best Windows keyboard shortcut round-ups, but lots of people still don’t use them daily.
Several of these popped up among Jen Gentleman’s tips, and they’re worth calling attention to yet again—a lot of people I know don’t use them regularly. Memorize them too, and you’ll save even more time and hassle while navigating Windows.
Win + Shift + S:Opens the Windows Snipping Tool for easy screenshots
Win + I: Opens the Settings app
Win + X:Opens the Quick Link menu (same as right-clicking on Start button)
Win + E: Opens a File Explorer window
Win + Home: Minimizes all windows but the active one
Win + Tab: Shows all open windows per monitor
Win + H: Opens the Windows dictation menu
Hungry for yet more Windows keyboard shortcuts? You can make your own! Just install PowerToys, an set of advanced utilities you can use to supercharge Windows. It includes a module called Keyboard Manager that lets you remap keys and create custom shortcuts.
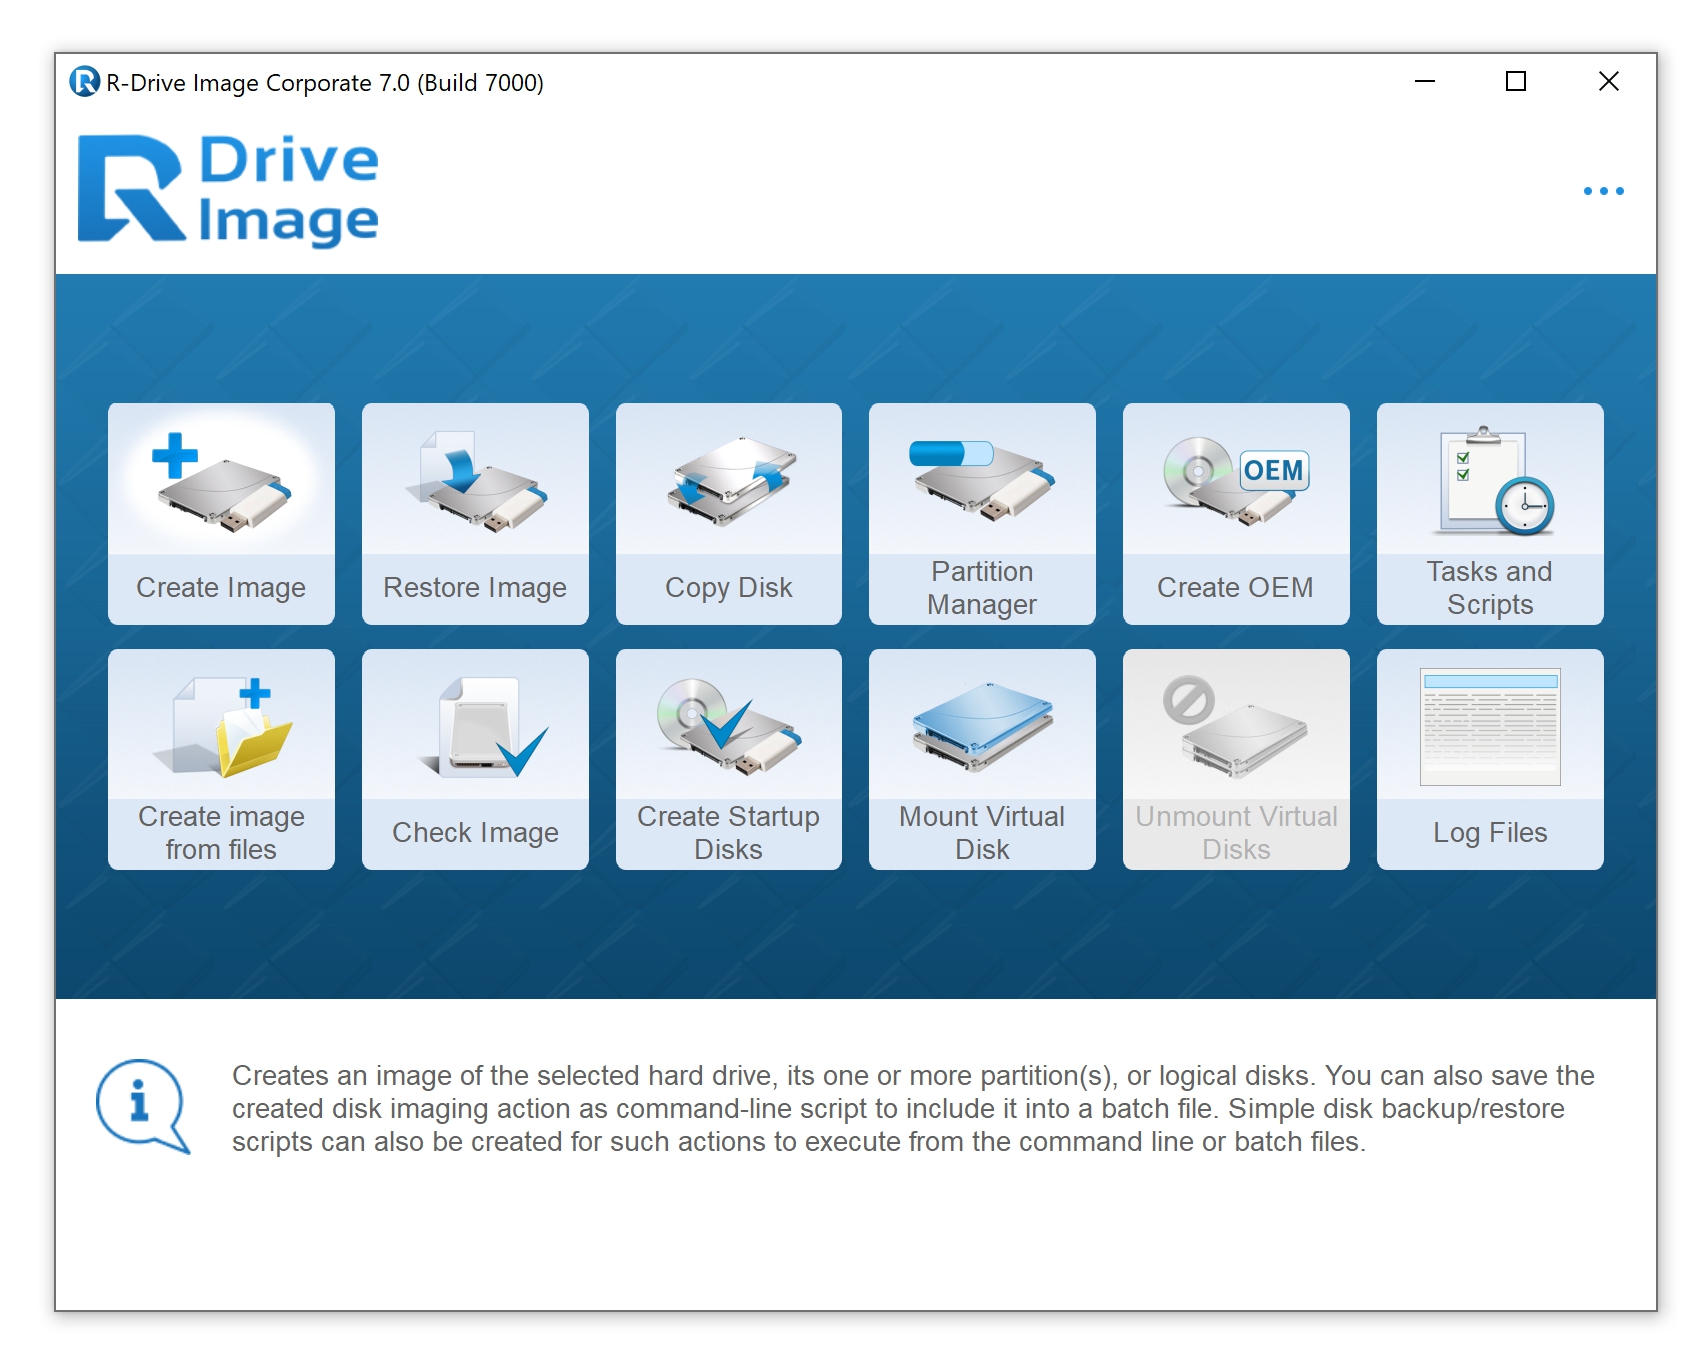
R-Drive Image has always been a favorite of ours—a low-resource-consuming product that was ultra-reliable in creating backup images of partitions and disks. But it didn’t have as much polish as Acronis’s backup program (below) and wasn’t as feature-rich. That has changed with this latest version, which now has a more modern, user-friendly interface and more versatility in the types of backups you can perform.
The latest 7.1 version adds WinPE boot-disc support and VHD compatibility to an already impressive arsenal of features. VHD compatibility, in particular, is a great new feature as R-Drive no longer entirely relies on its own proprietary images, but now allows users the option to keep backups in VHD (Virtual Hard Disk) format—which addresses one of the only previous complaints we had about the service.
There’s a reason Acronis is renowned in the world of backup software. Cyber Protect Home Office (previously named Acronis True Image) is capable, flexible, and rock-solid reliable. Indeed, it’s easily the most comprehensive data safety package on the planet.
Besides offering unparalleled backup functionality that’s both robust and easy to navigate, it integrates security apps as well, which protect against malware, malicious websites, and other threats using real-time monitoring.
Install your doorbell and connect to an existing chime
Your battery doorbell can be hardwired to work with your home’s existing chime.
Before you start installing your doorbell, make sure to shut off power at the breaker. If you’re not sure which breaker controls your doorbell, turn off your home’s master breaker or contact an electrician.
Once power is turned off, remove your existing doorbell button from the wall and disconnect the wires. Your Ring doorbell is compatible with doorbell systems supplying 8 to 24 VAC at 50/60Hz, 5VA to 40VA.
CAUTION! You’ll be working with electrical wires during the install process. If you are uncomfortable or inexperienced with doing so, consult with a licensed electrician. Do not wire your Ring doorbell to a DC-powered intercom system or other DC power source.
1. Optional: Install the corner mount.
If you’re installing a corner mount, remove the corner bracket screws from Bag C.
Pull your home’s existing wires through the center of the corner mount before installing on the wall.
If installing on a wood surface, screw the bracket directly into the wall.
If installing on a masonry surface, mark two screw holes using the bracket as a guide.
Drill pilot holes using a 1/4″ drill bit. Insert the wall anchors from Bag C, then drive the medium bracket screws through the bracket into the wall anchors.
WARNING! Only use the included corner bracket screws when securing the corner bracket.
CAUTION! Do not drill or drive screws into your home’s electrical wiring.
2. Secure the wires to the terminals.
Loop each doorbell wire around the screw terminals on the back of the doorbell, then tighten to secure. It doesn’t matter which wire connects to which screw.
If the wires are too short to reach the doorbell, use the wire extenders with the wire nuts found in Bag D.
At the end, feed all the wires (and wire nuts and extenders if used) back into your wall.
3. Mount your doorbell to the wall or corner bracket.
Remove the short mounting screws from Bag A.
If installing on a wood surface, screw the doorbell directly into the wall.
If installing on a masonry surface, mark four screw holes using the doorbell as a guide. Drill pilot holes using a 1/4″ drill bit. Insert the wall anchors, the drive the short mounting screws through the mounting plate into the wall anchors.
If using a corner mount, use the short bracket screws from Bag C to secure your doorbell to the bracket.
WARNING! Only use the included corner bracket screws when securing the corner bracket.
WARNING! Only use the included wall mounting screws when securing the doorbell.
CAUTION! Do not drill or drive screws into your home’s electrical wiring.
4. Insert the battery and secure the faceplate.
CAUTION! If you use the wrong screws to secure the faceplate, you could damage the battery during installation, create a fire hazard, and be seriously injured.
DO NOT USE any screw other than the included short security screws when securing the faceplate. Lastly, use the included screwdriver to insert and tighten one of the security screws from Bag B.